Nikon Z 9, I refer in this article as Nikon Z9 or simply Z9 for my convenience, is the first Nikon flagship mirrorless camera.
Though the below are my first impressions after using Z9 for about two weeks, this is still a lengthy post. Please read this in your leisure. This article covers only the photography aspects.
I am a hobbyist bird photographer owned Nikon D90, Nikon D800E and Nikon D500 before buying Nikon Z9. Sigma 150-600mm 5-6.3 Sports DG OS HSM is my primary lens for birding and now using it with FTZ Adapter II.
I took all the images posted in this article from my balcony as my current schedules are not permitting me for any birding trip(s). Taking images from the balcony is not easy, poses bigger challenges to auto focus.
You may see more comparisons of Nikon Z9 with Nikon D500 in this article as I was using Nikon D500 as my primary camera for bird photography for over 5 years.
Key observations
Game Changer feature of Mirrorless
I want to share the biggest advantage of mirrorless over DSLR here for those who want to invest in Z9 as their first mirrorless camera like me. For example, if a small bird is sitting deep in the branches in darker conditions, it is impossible to locate the bird using DSLR with a super telephoto lens. But with mirrorless, by increasing the exposure +3 EV and above, it opens a new world to search that bird in those conditions as the view finder simulates the scene with that exposure. Sometimes, this is a game changer especially when searching for a shy or rare bird/animal in challenging lighting.
Firmware Update 2.1
Auto focus improvements are phenomenal. Below scenarios explain the improvements of Firmware 2.1 over Firmware 2.0
- Focus Accuracy of Static subjects – Able to focus instantly in scenarios where the failure rate was 100% earlier.
- Focus Accuracy of Moving subjects – 3D tracking initial acquisition is now similar or slightly better than the Dynamic-area AF (L) but the most critical improvement is my consumer lens AF-S 70-300mm VR which used to struggle most of the times earlier to lock the focus, is able to lock the focus instantly now. Also, the bird-in-flight images were soft earlier in low light but now they are tack sharp with this lens. Subject/face detection is also spot on even when the subject is at a considerable distance in overcast conditions.
- Static subject tracking – 3D tracking is so good now that it hardly looses the focus once locked even when the subject is very small and then the subject is moved to any extreme corners of the viewfinder.
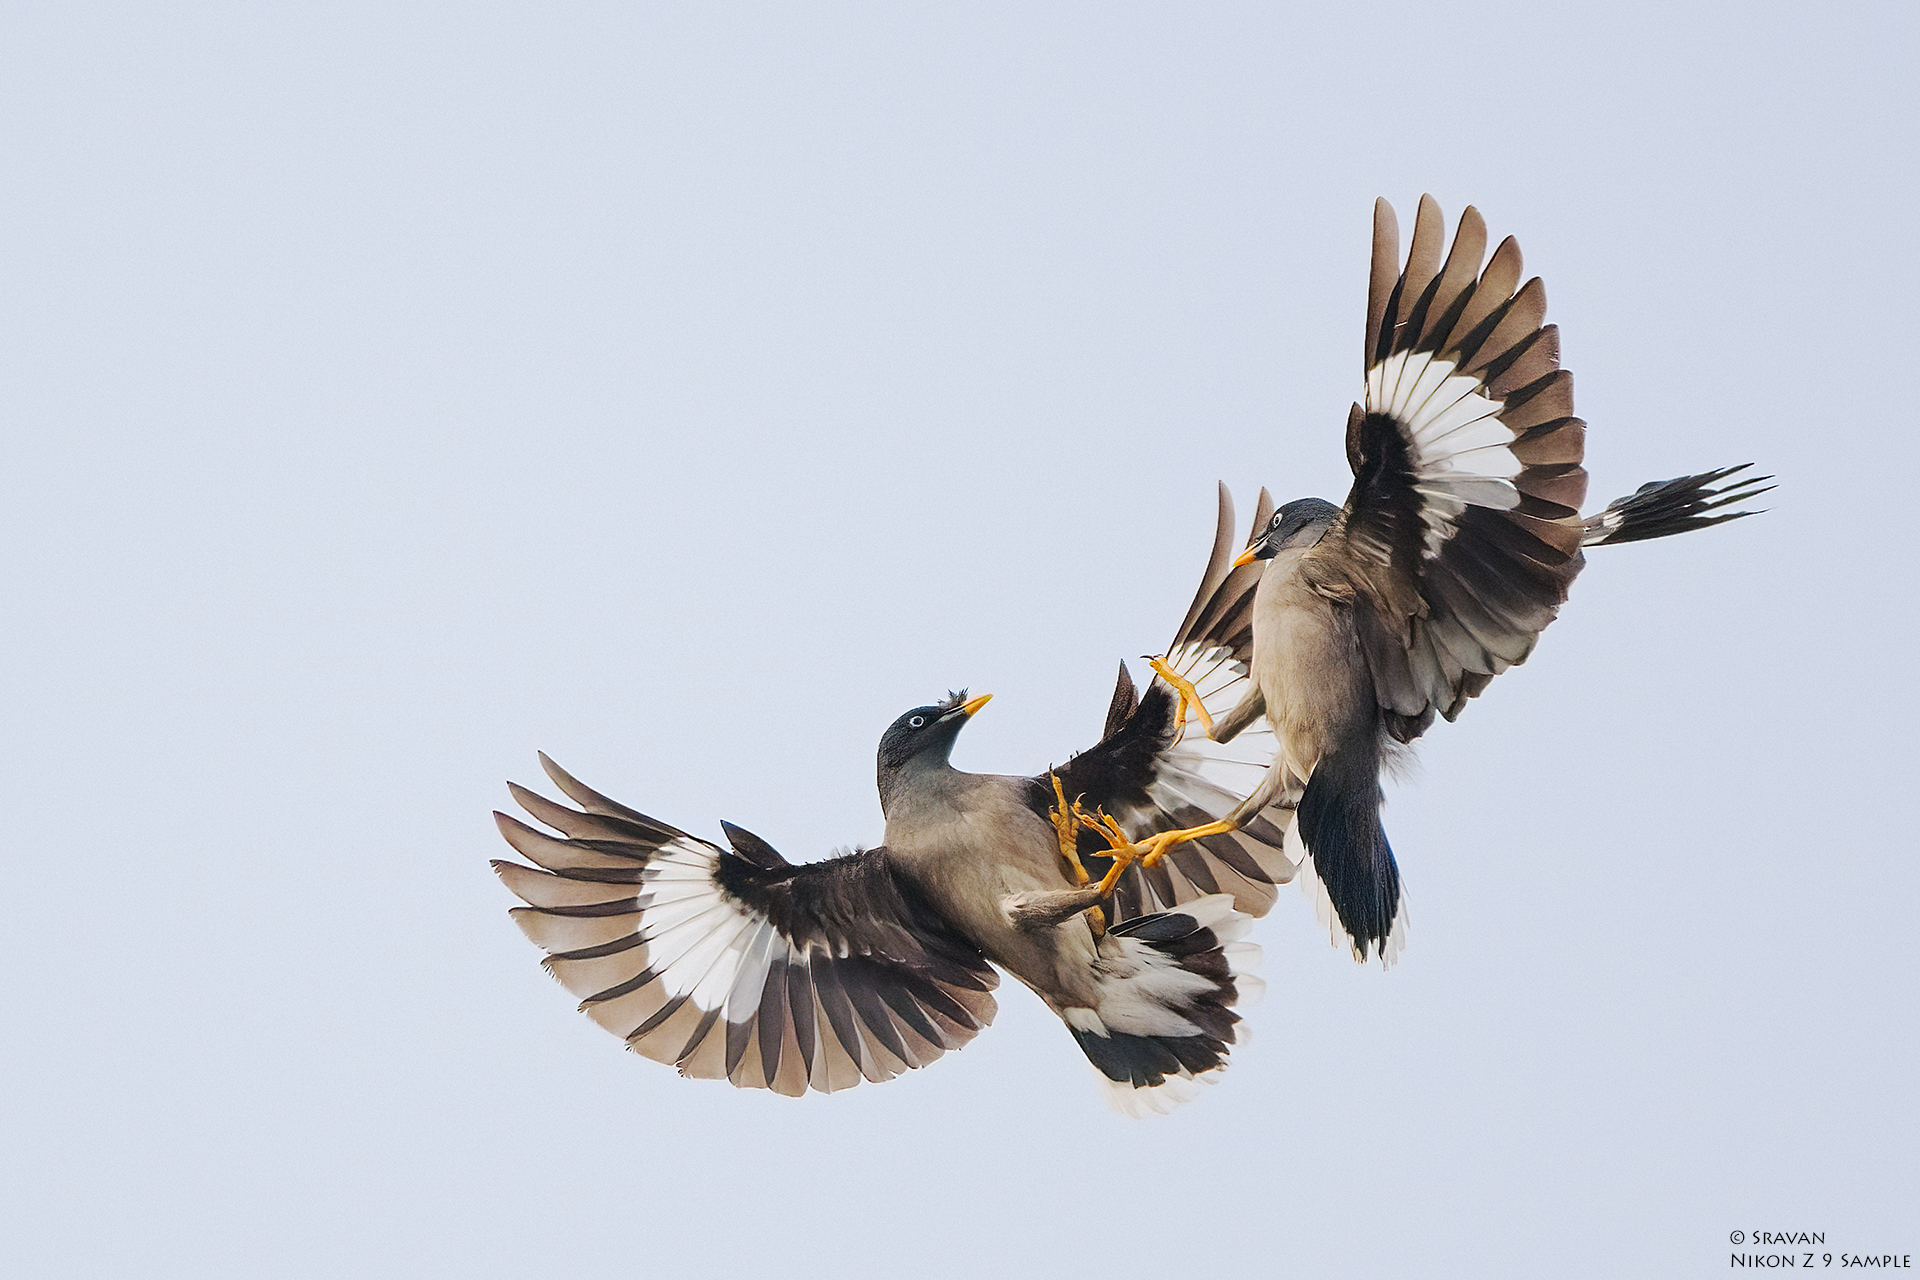
- Tracking of Moving subjects – This is at another level now. The scenarios where I was never even attempting to focus and shoot due to that shortest window to lift the camera, acquire the focus and capture that moment, I am getting 50% photos in that time even with 70-300mm lens now. Sigma 150-600mm Sports is producing crisp images in low light too. This is unimaginable, opening new opportunities in toughest situations.
- Focus from shorter to longer distance and vice versa with busy backgrounds – Tremendous improvement in focus acquisition which the camera earlier used to take more time.
- Improved focus accuracy – Earlier when the subject is very close to the background like a wall, auto focus sometimes was locking on the wall when the subject is small and at a distance. Now the camera is nailing the focus on the subject.
Firmware Update 2.0
The new features added in this firmware are just incredible.
Most impressive part of this update is the initial focus acquisition speed of 3D-tracking AF. With firmware version 1.1, 3D AF initial focus acquisition was at snail’s pace. Now with 2.0, when I used the same lens. focus is acquired instantly for static subjects.
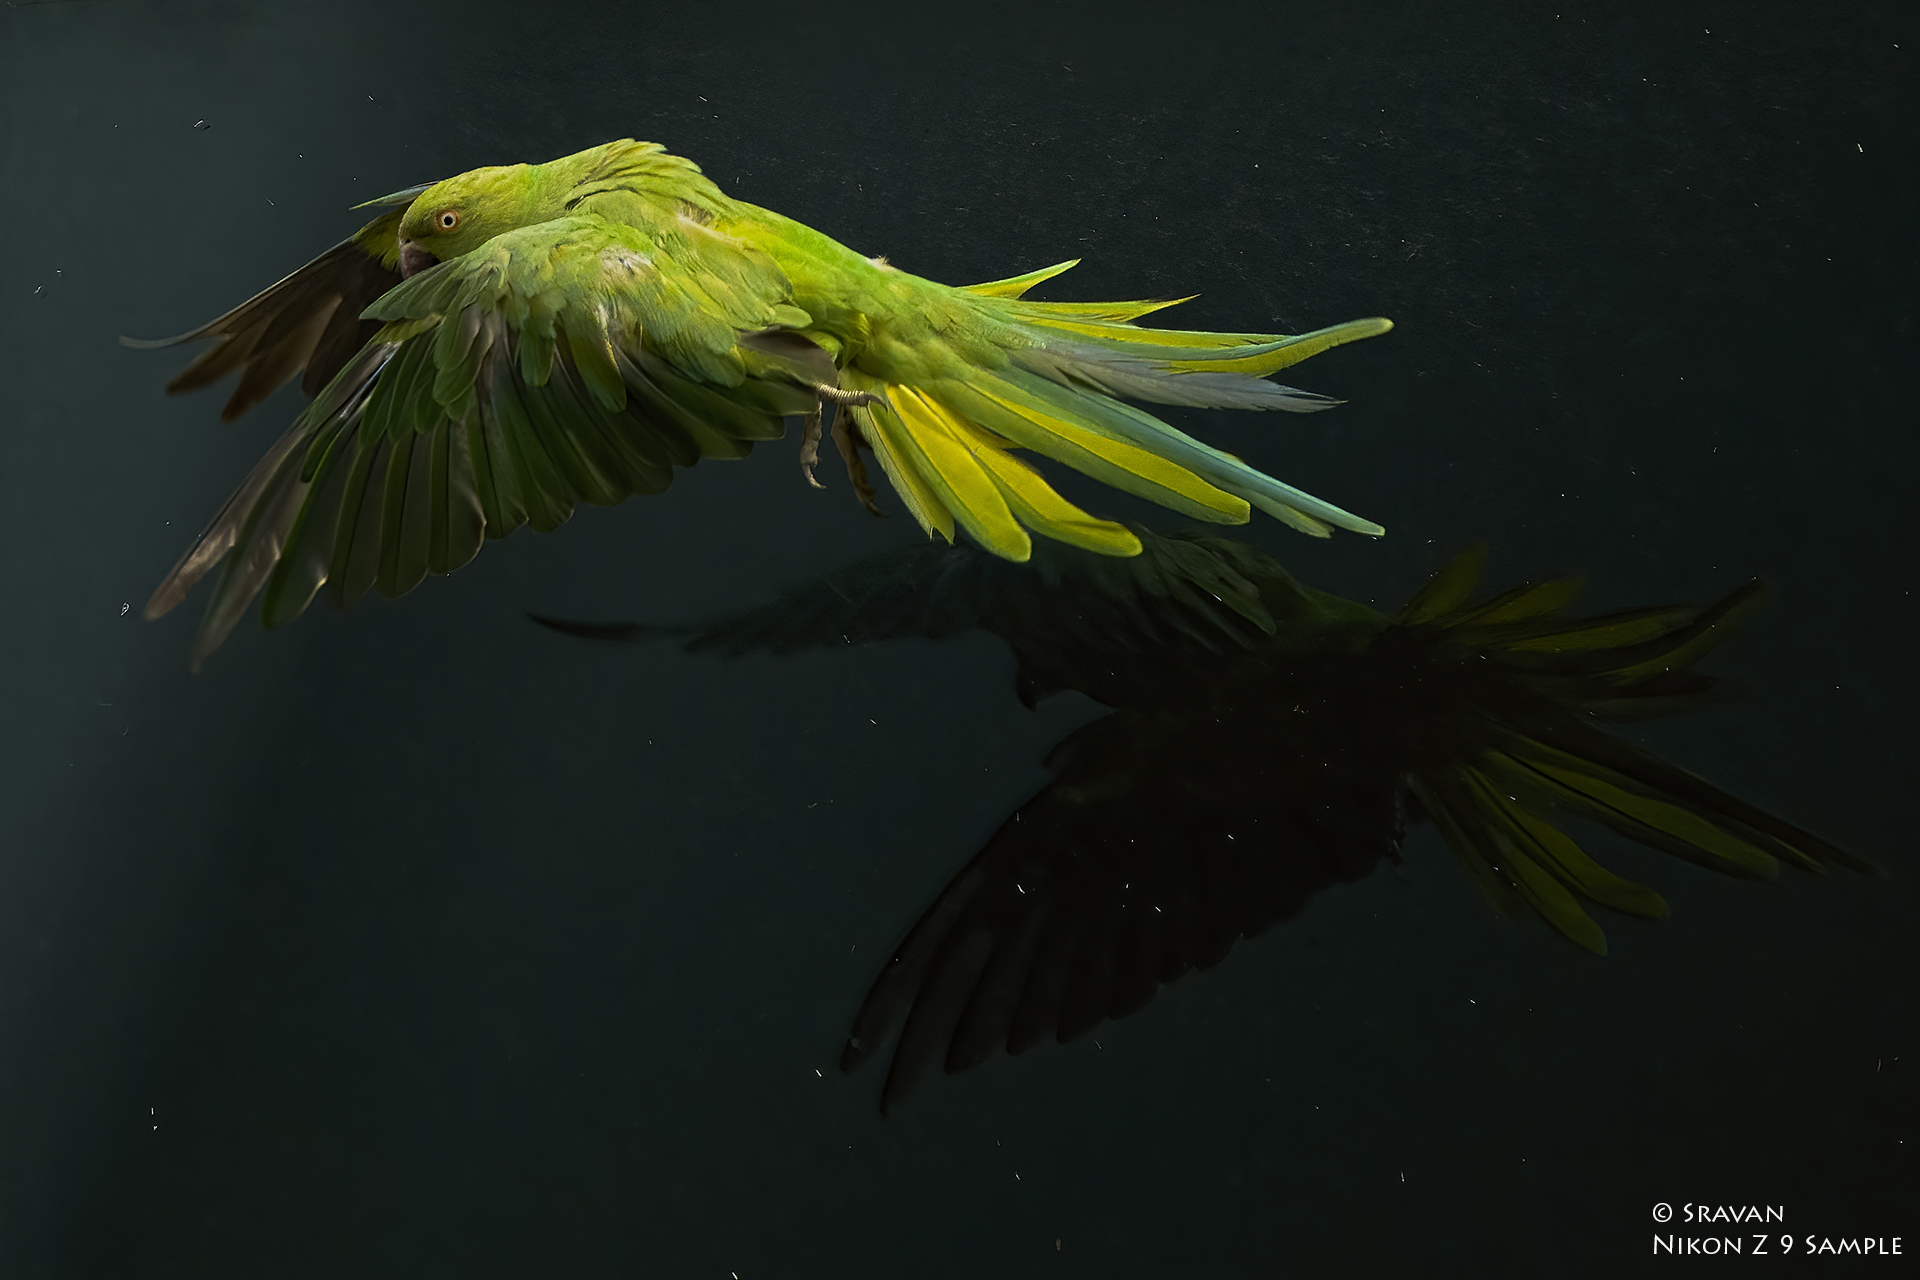
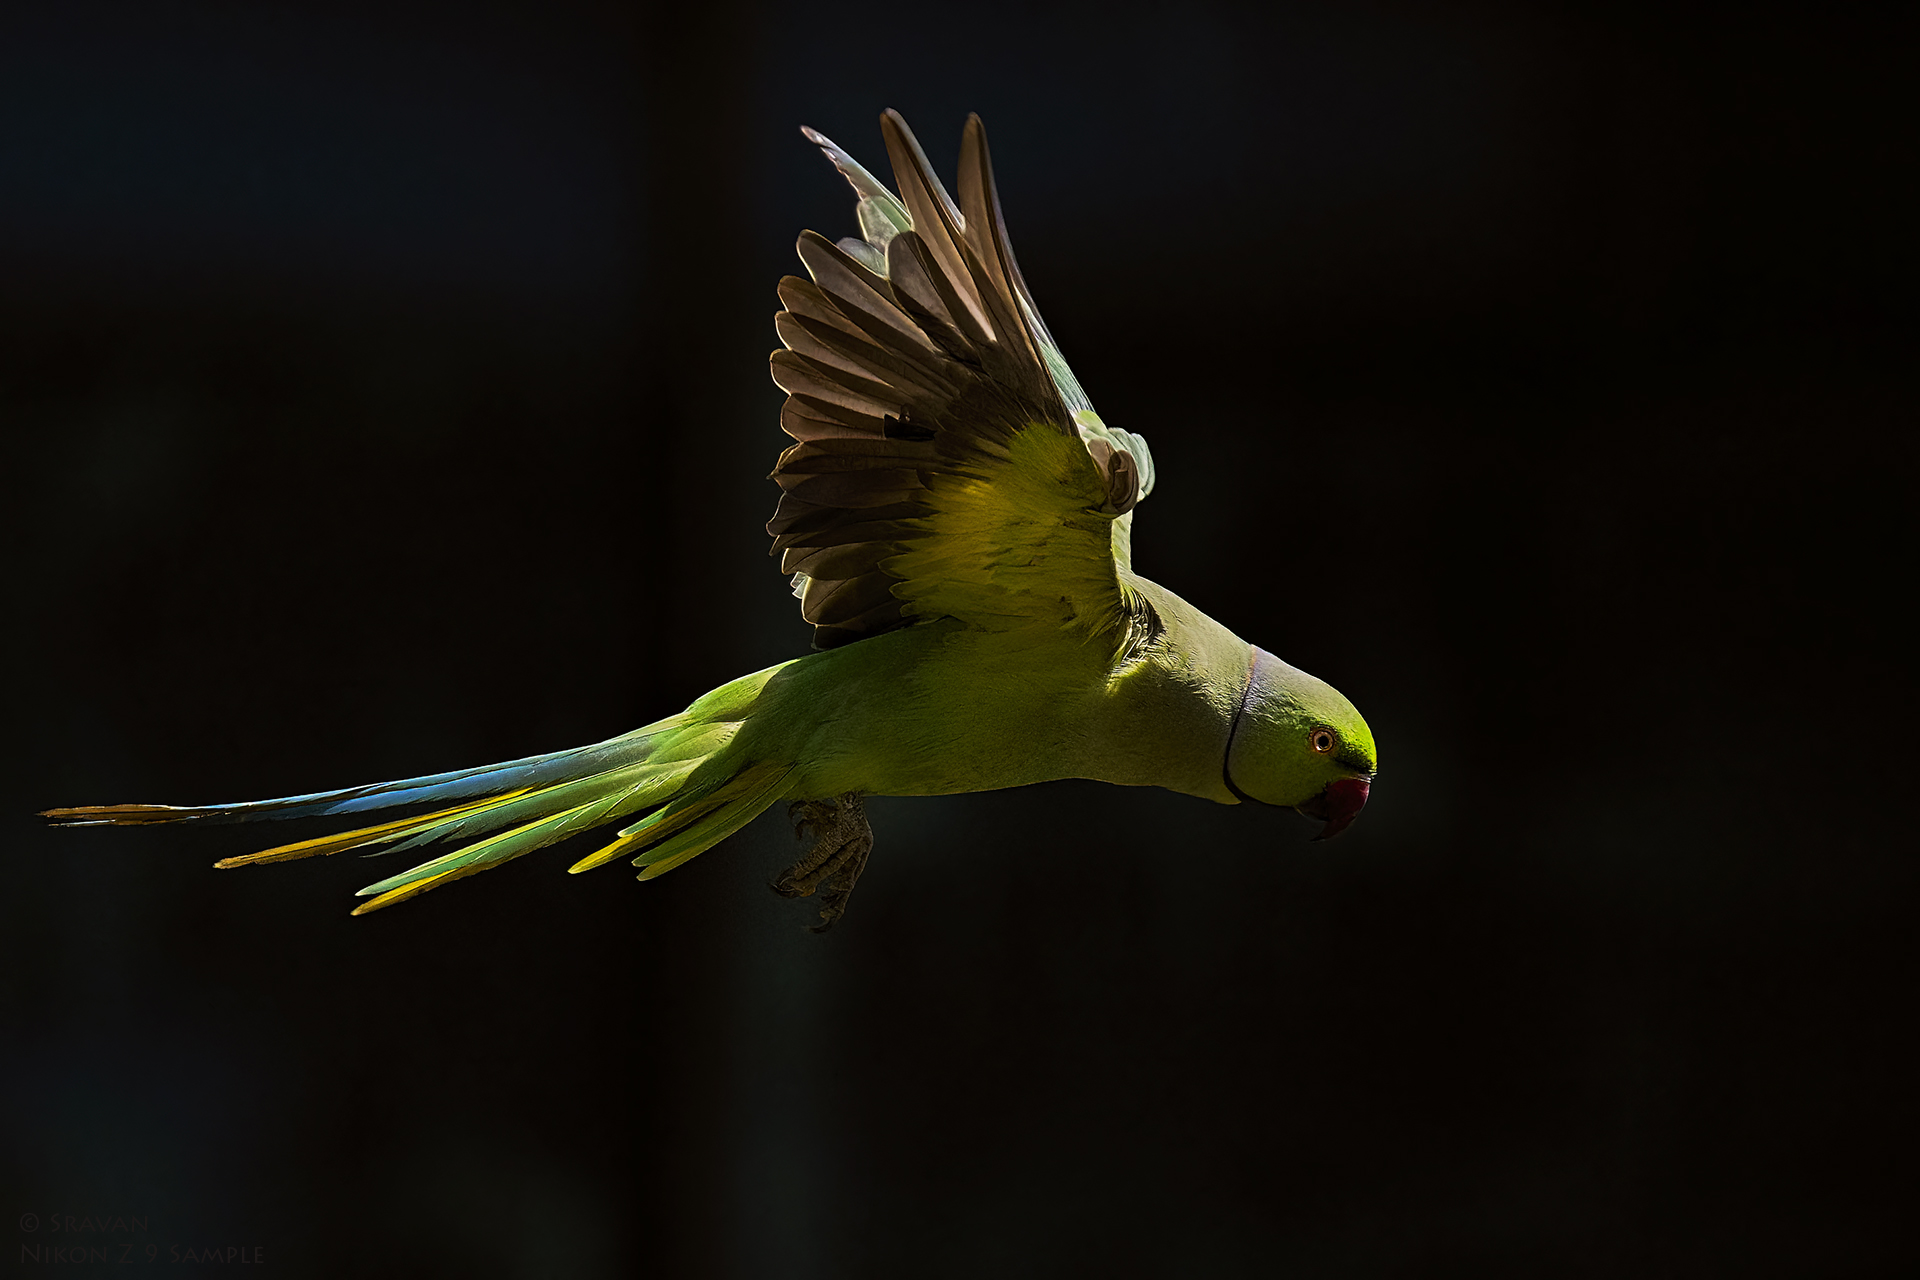
Auto focus
I was able to capture photos in the first 4 days of using Nikon Z9 which I was trying from last 5+ years using Nikon D500 with the same lens. Below are few of them. I am showcasing here mostly the fastest action which is very tough to freeze in those conditions. Even I was unable to get consistent exposures with Nikon D500 in these situations which Z9 handled very well.
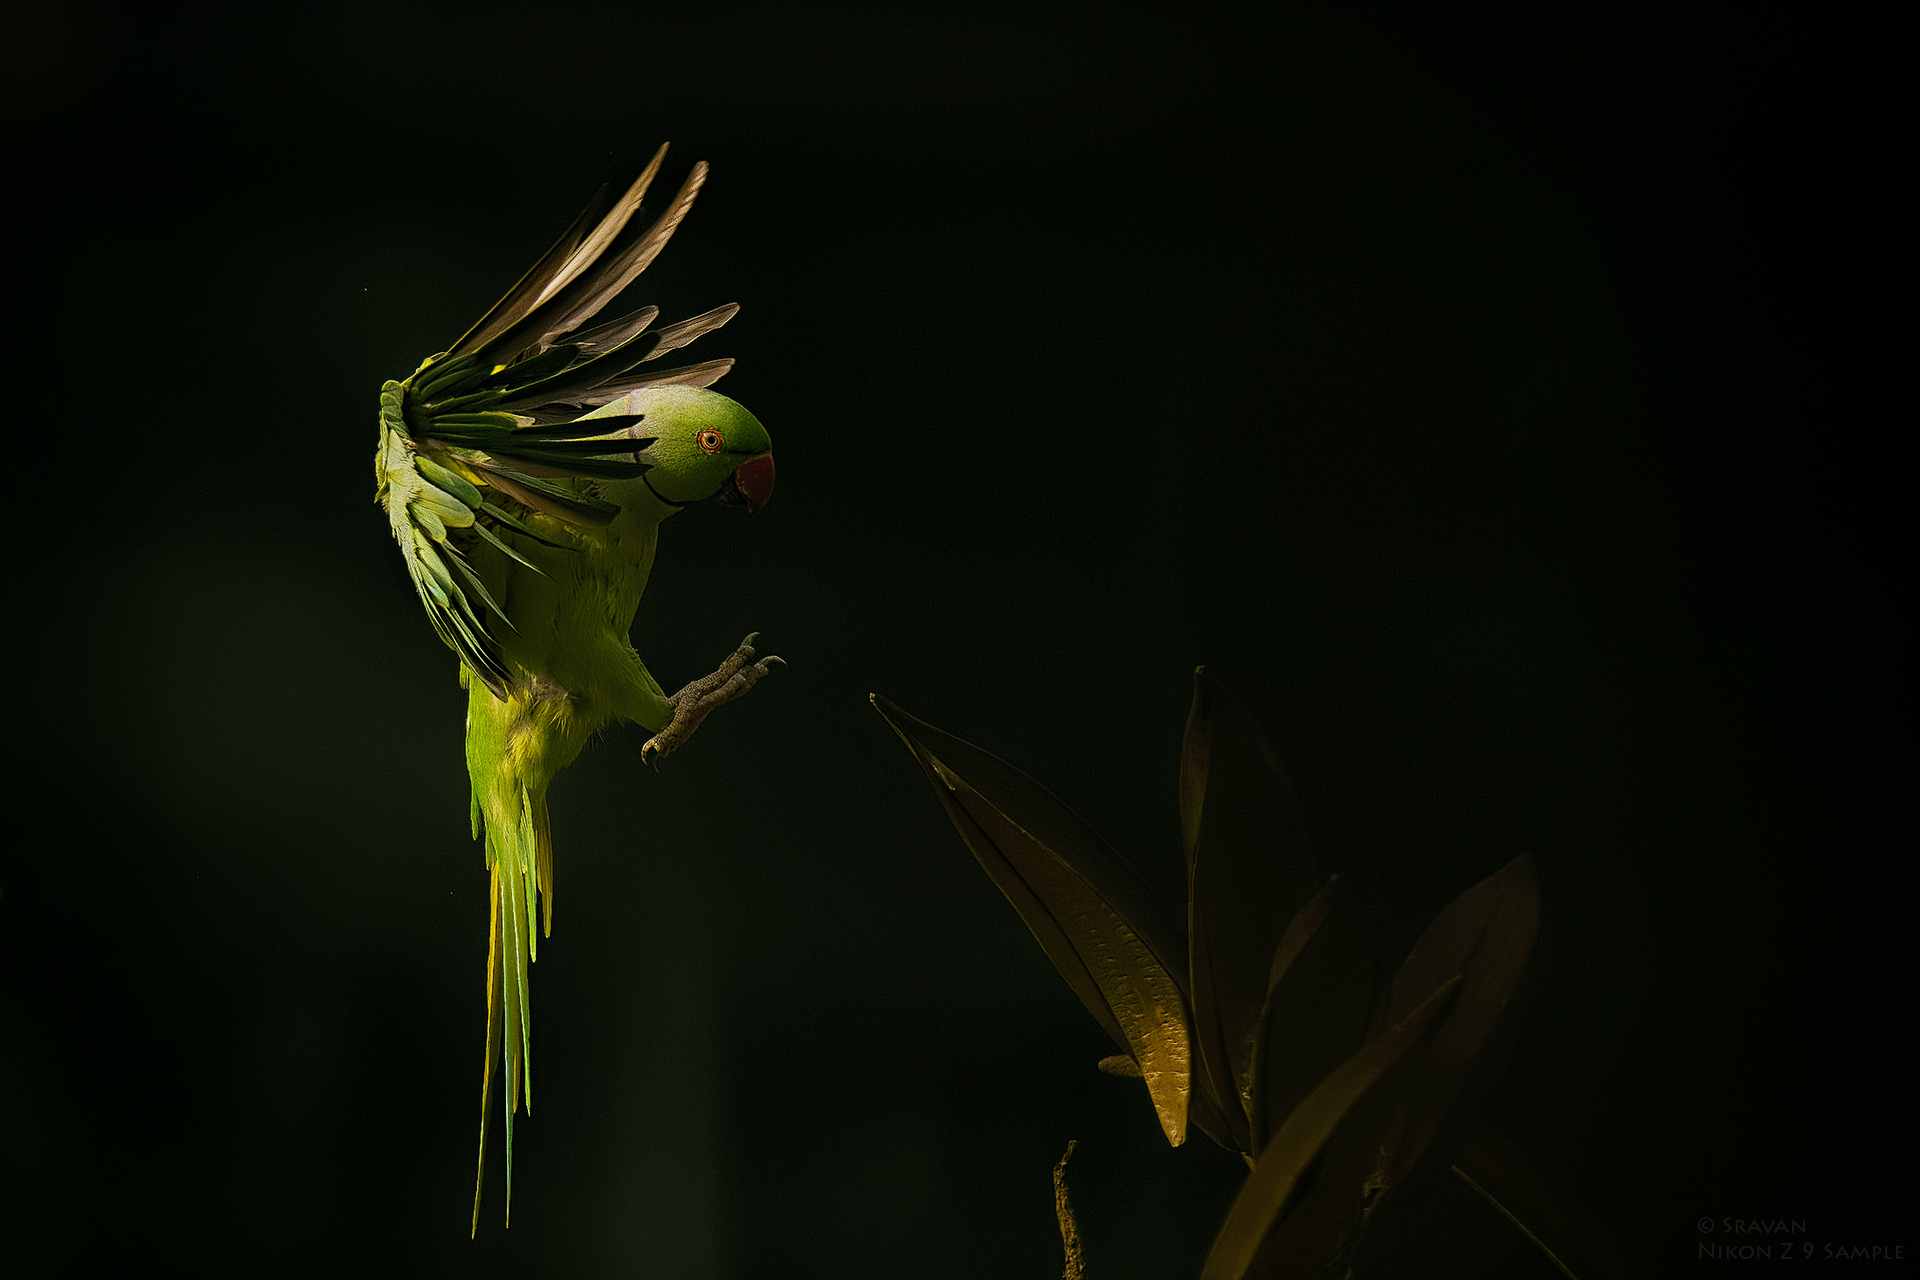
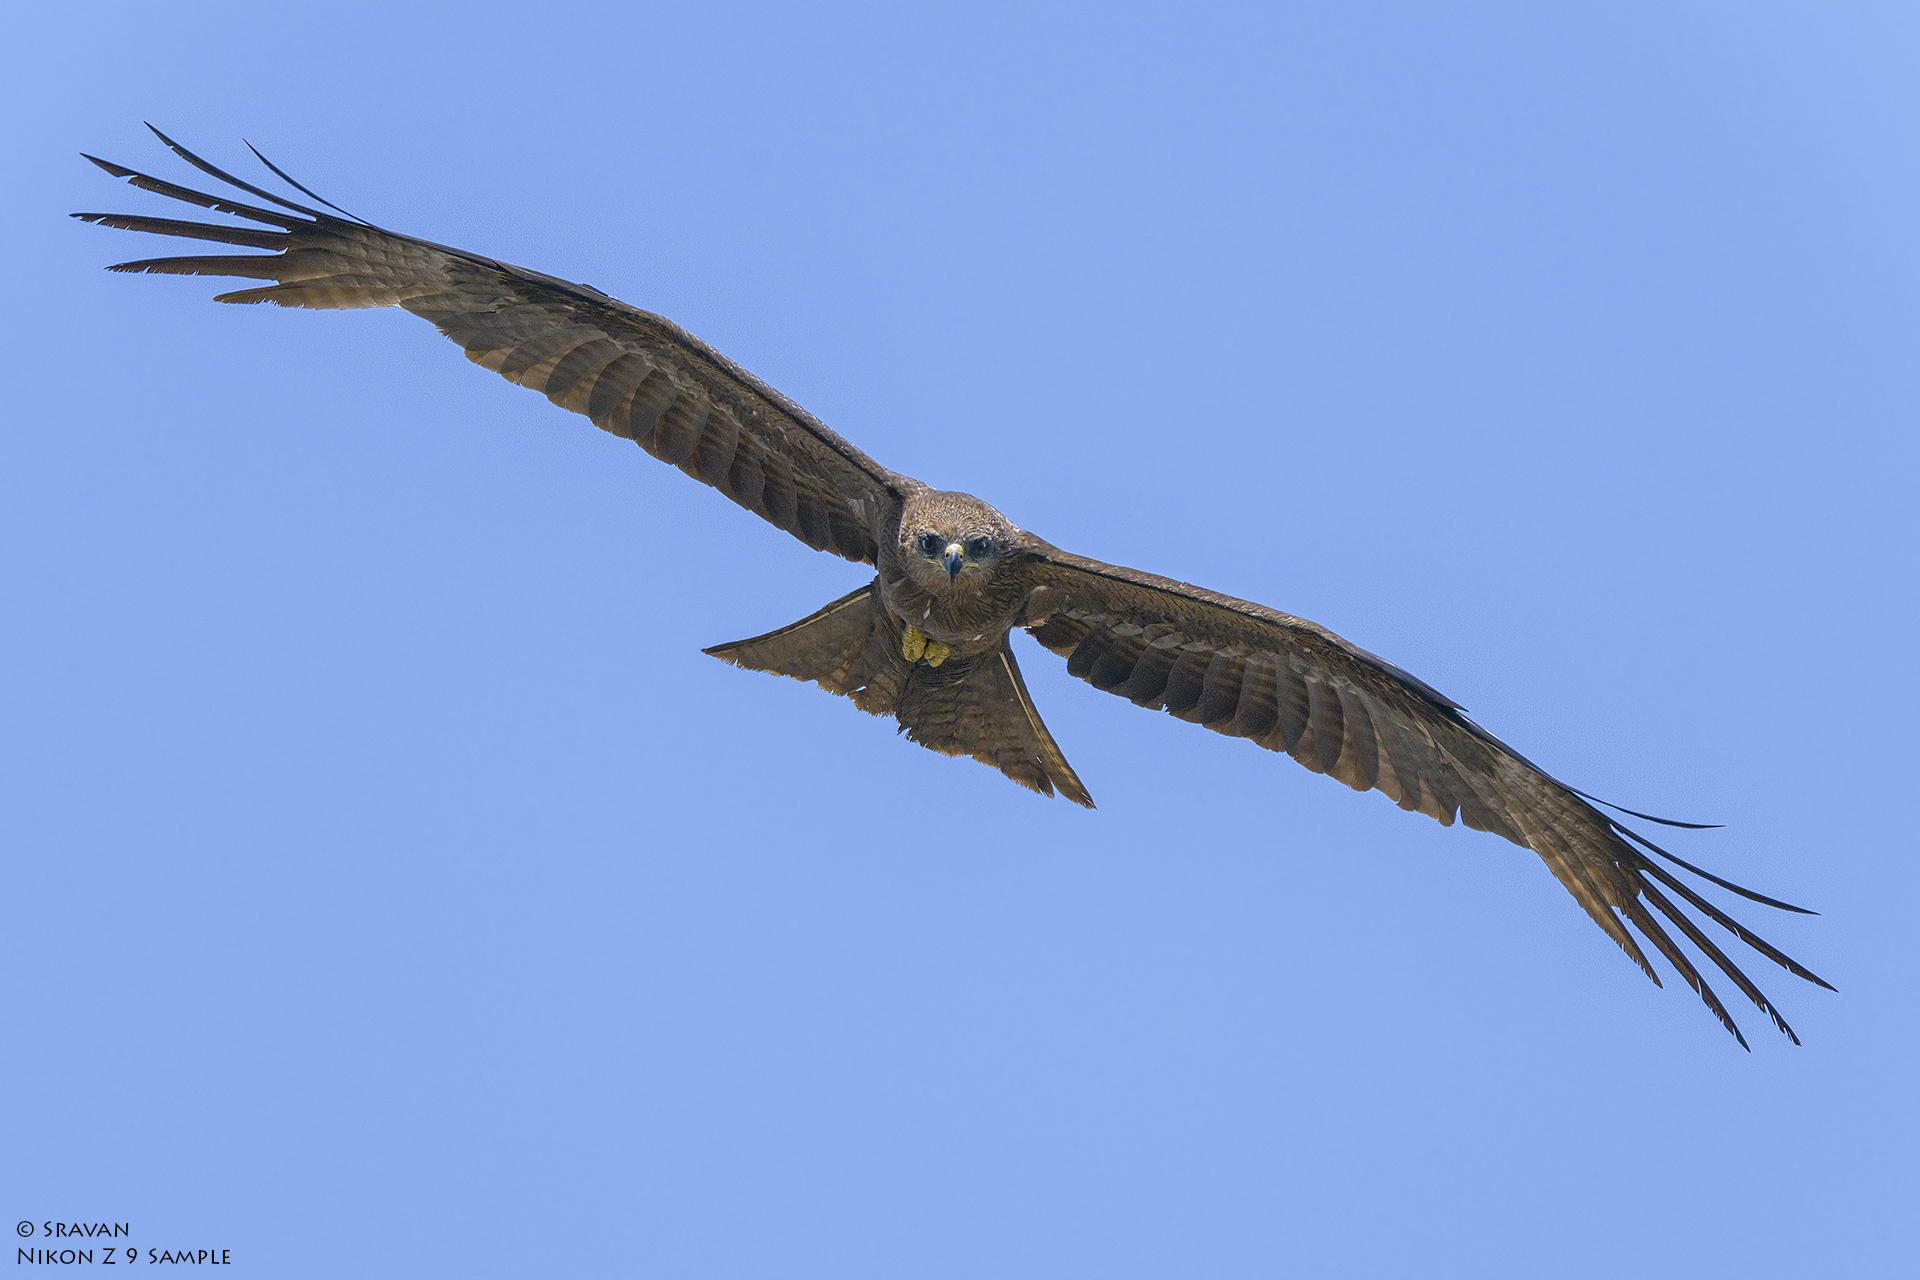
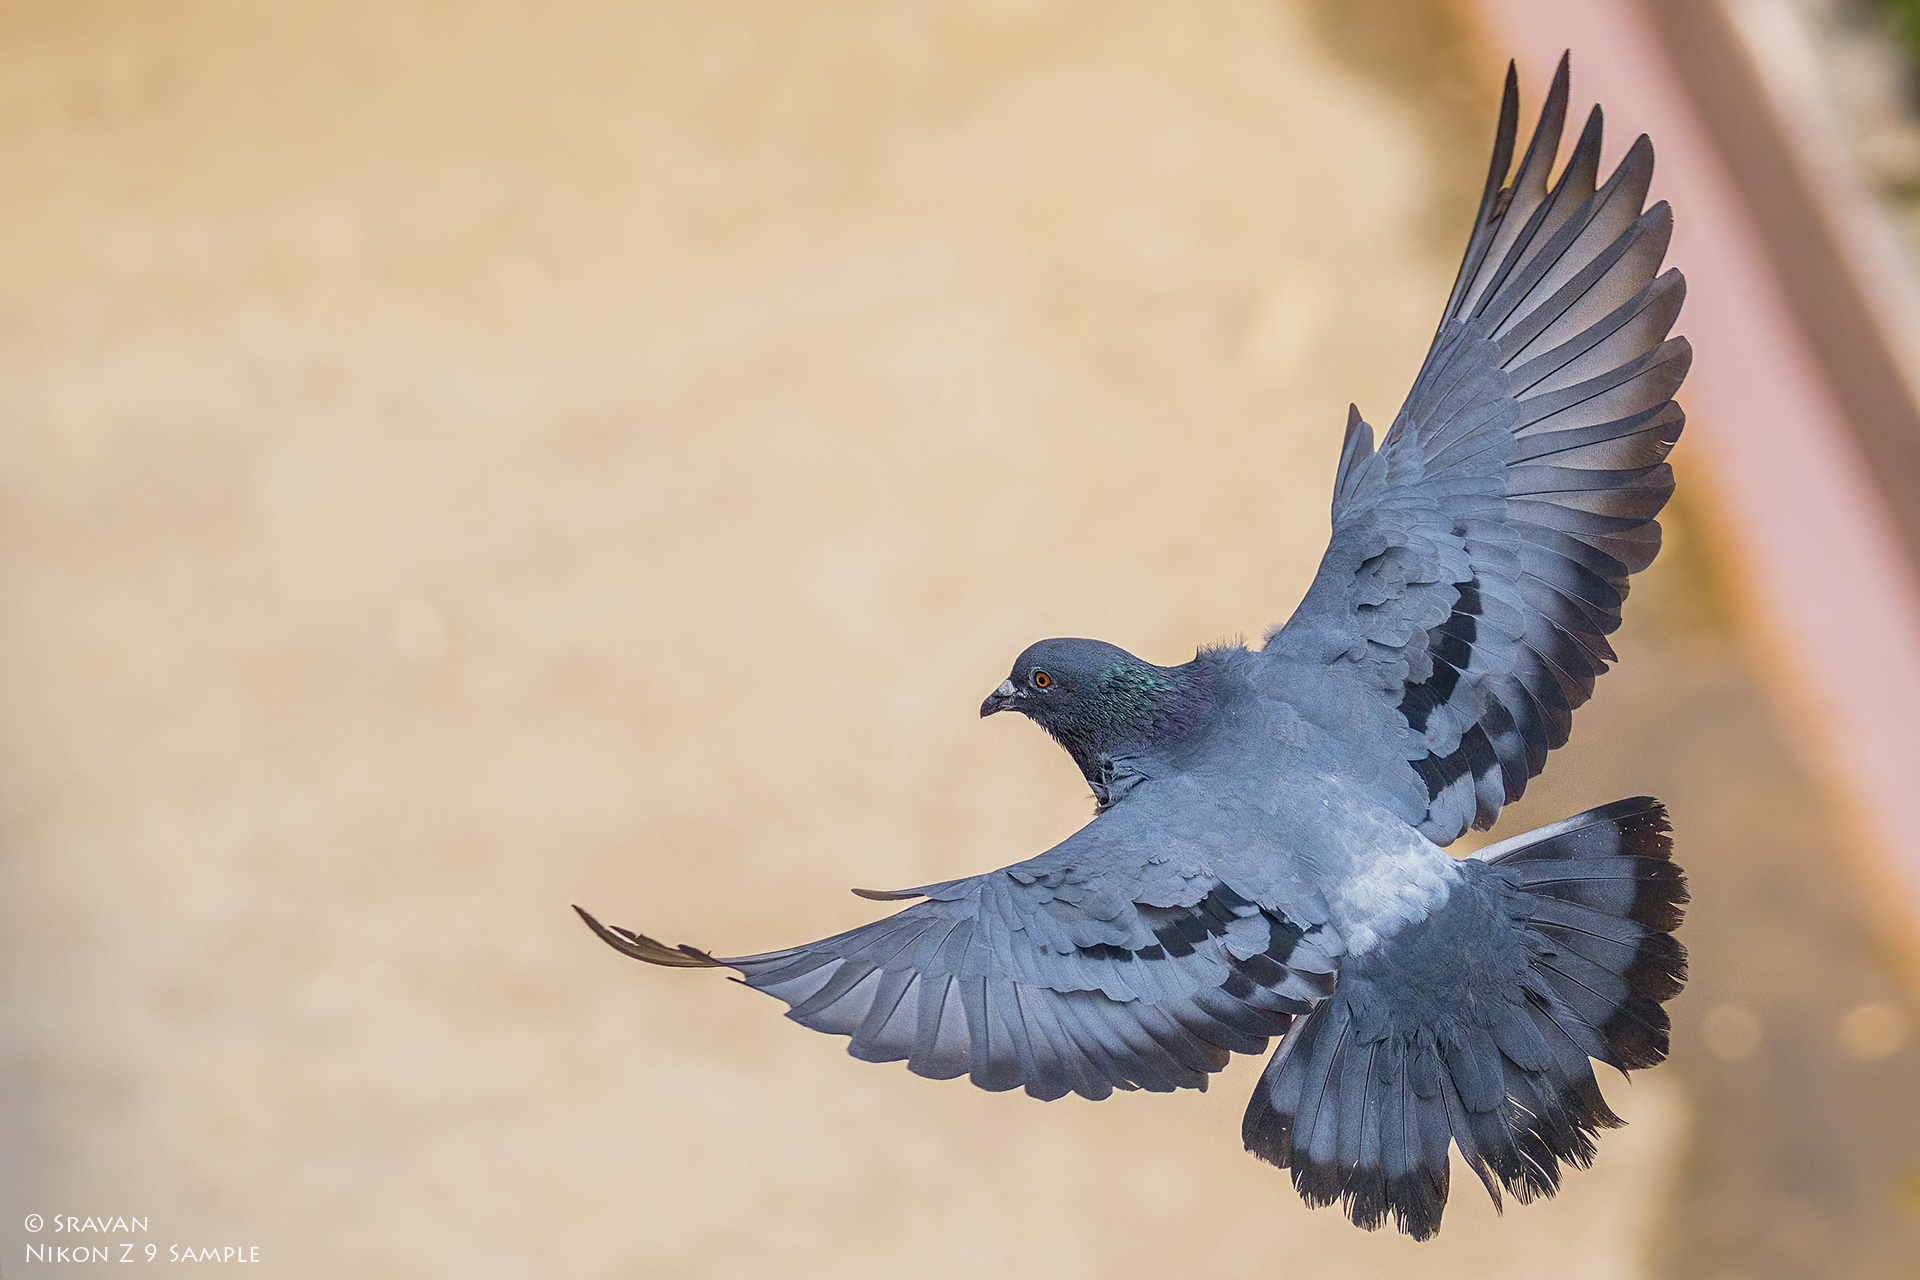
3D Tracking
3D tracking is used to capture the below once the initial focus is acquired through Wide-area AF (L) focus mode (Z9 with firmware 1.1).
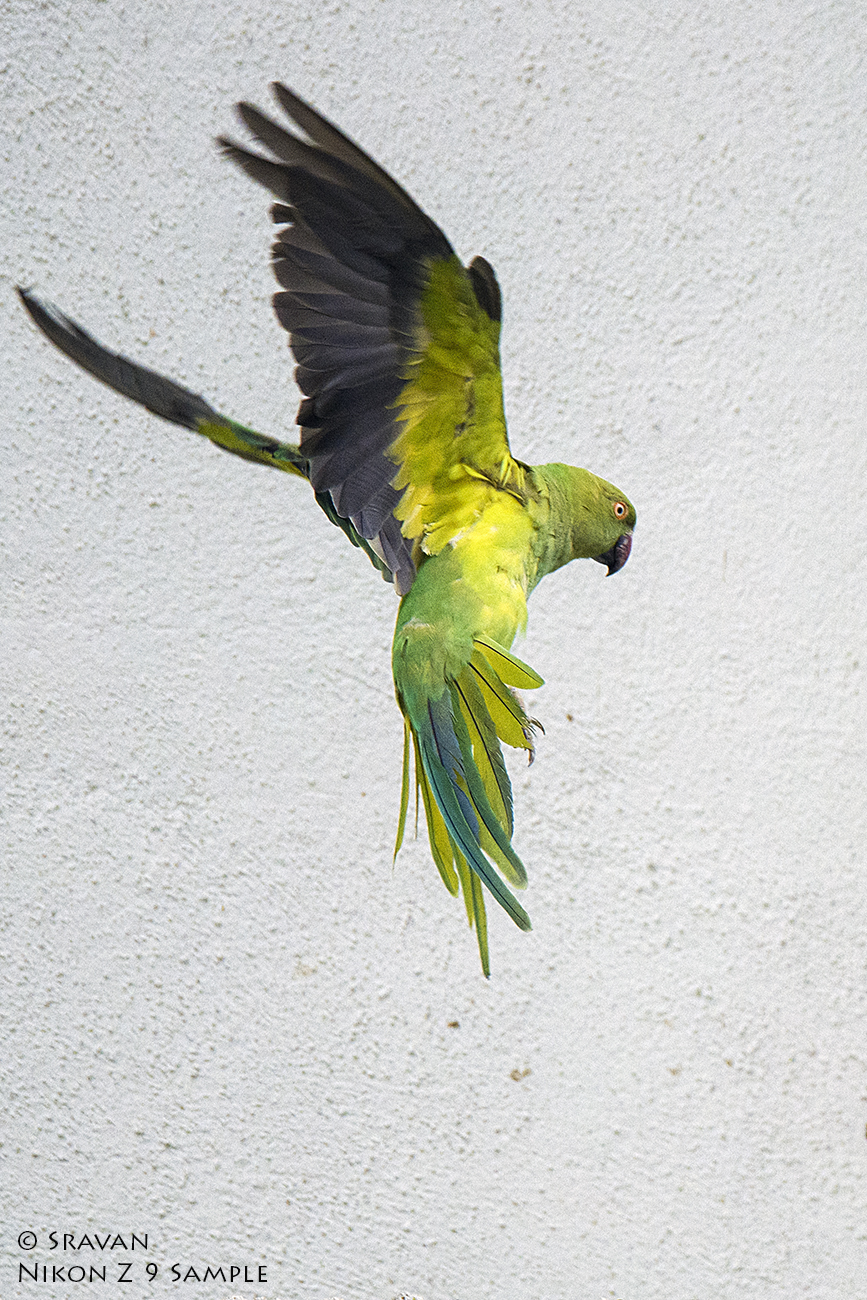
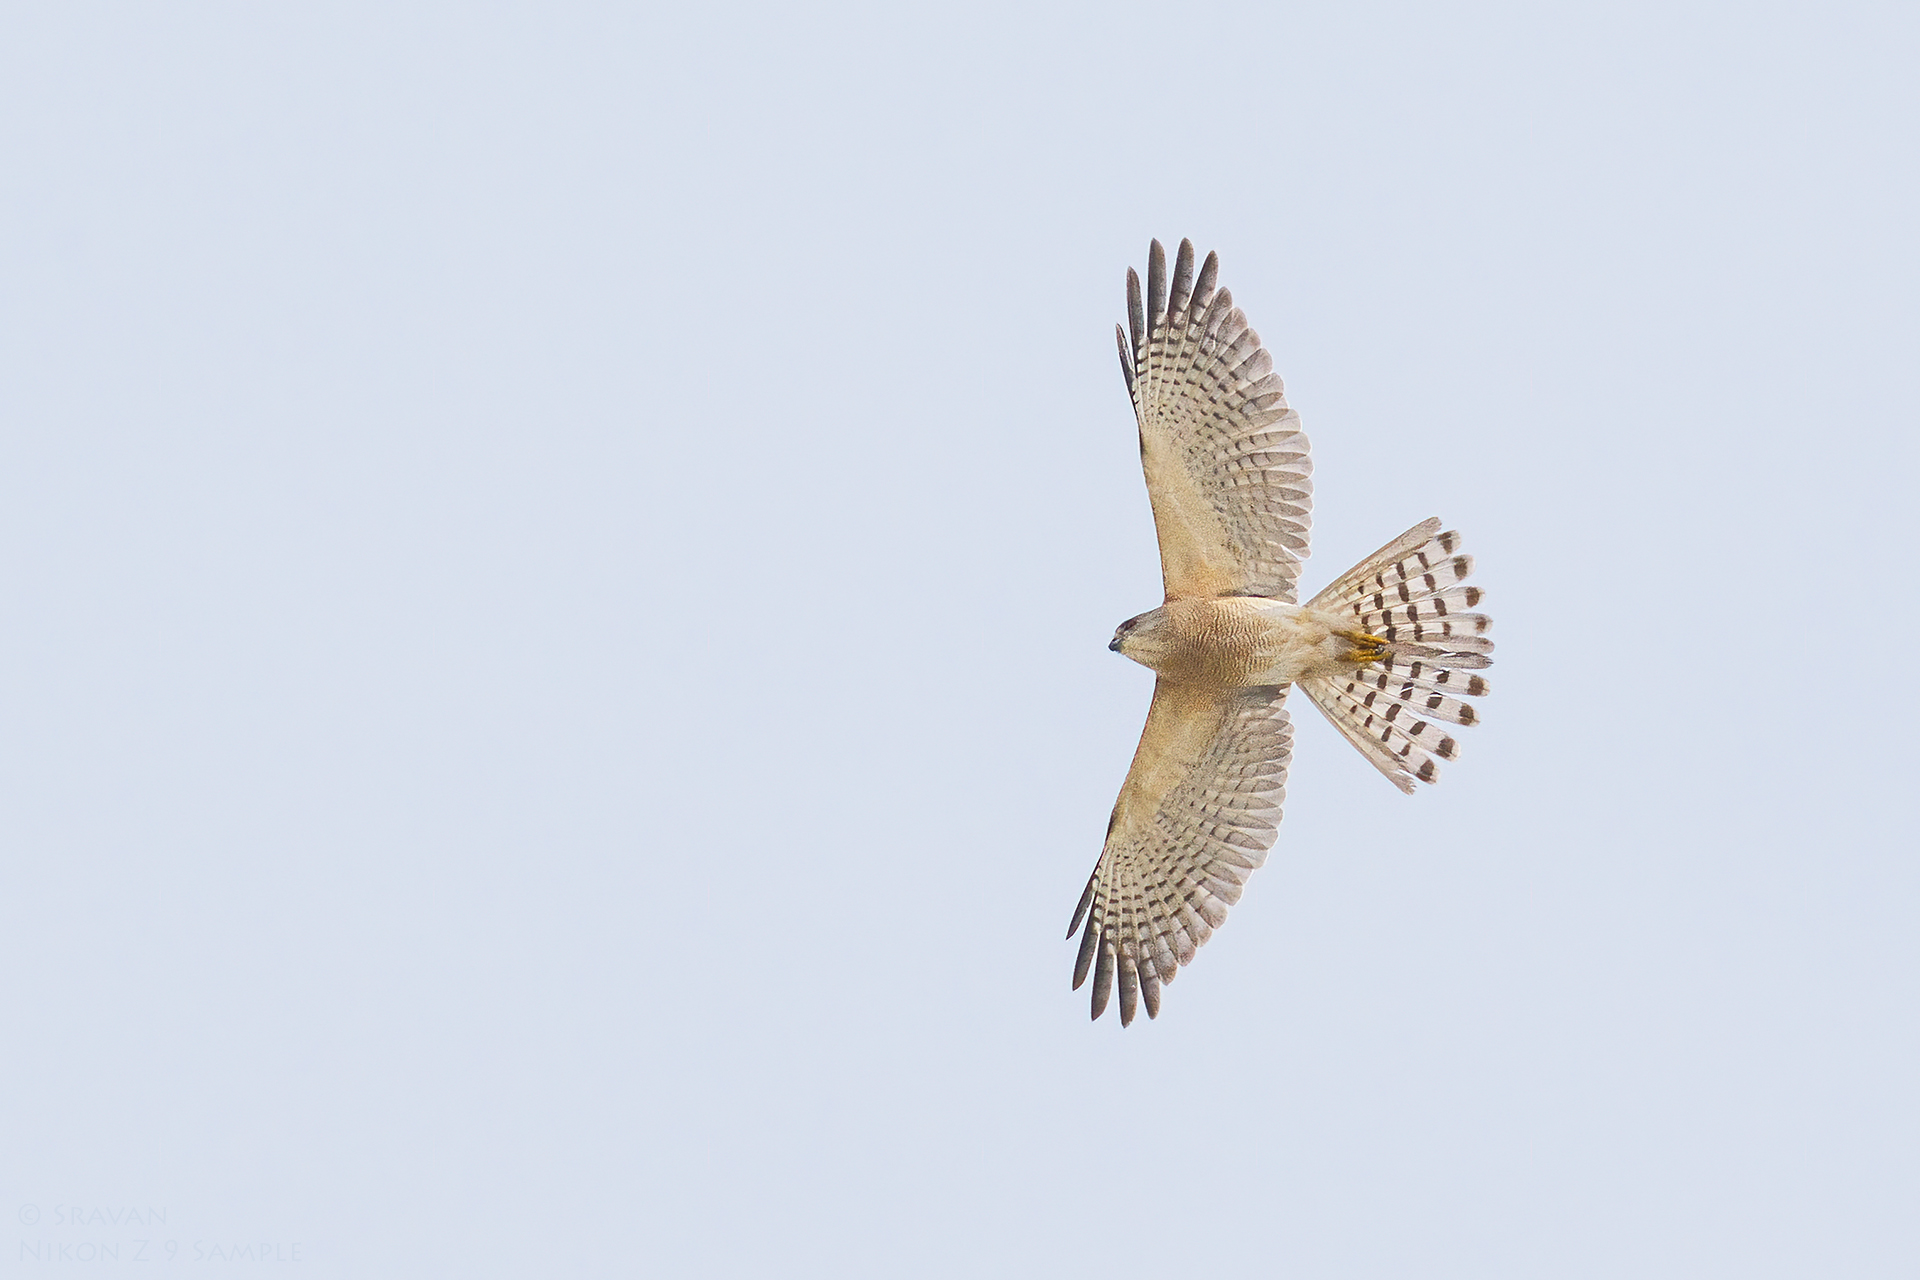
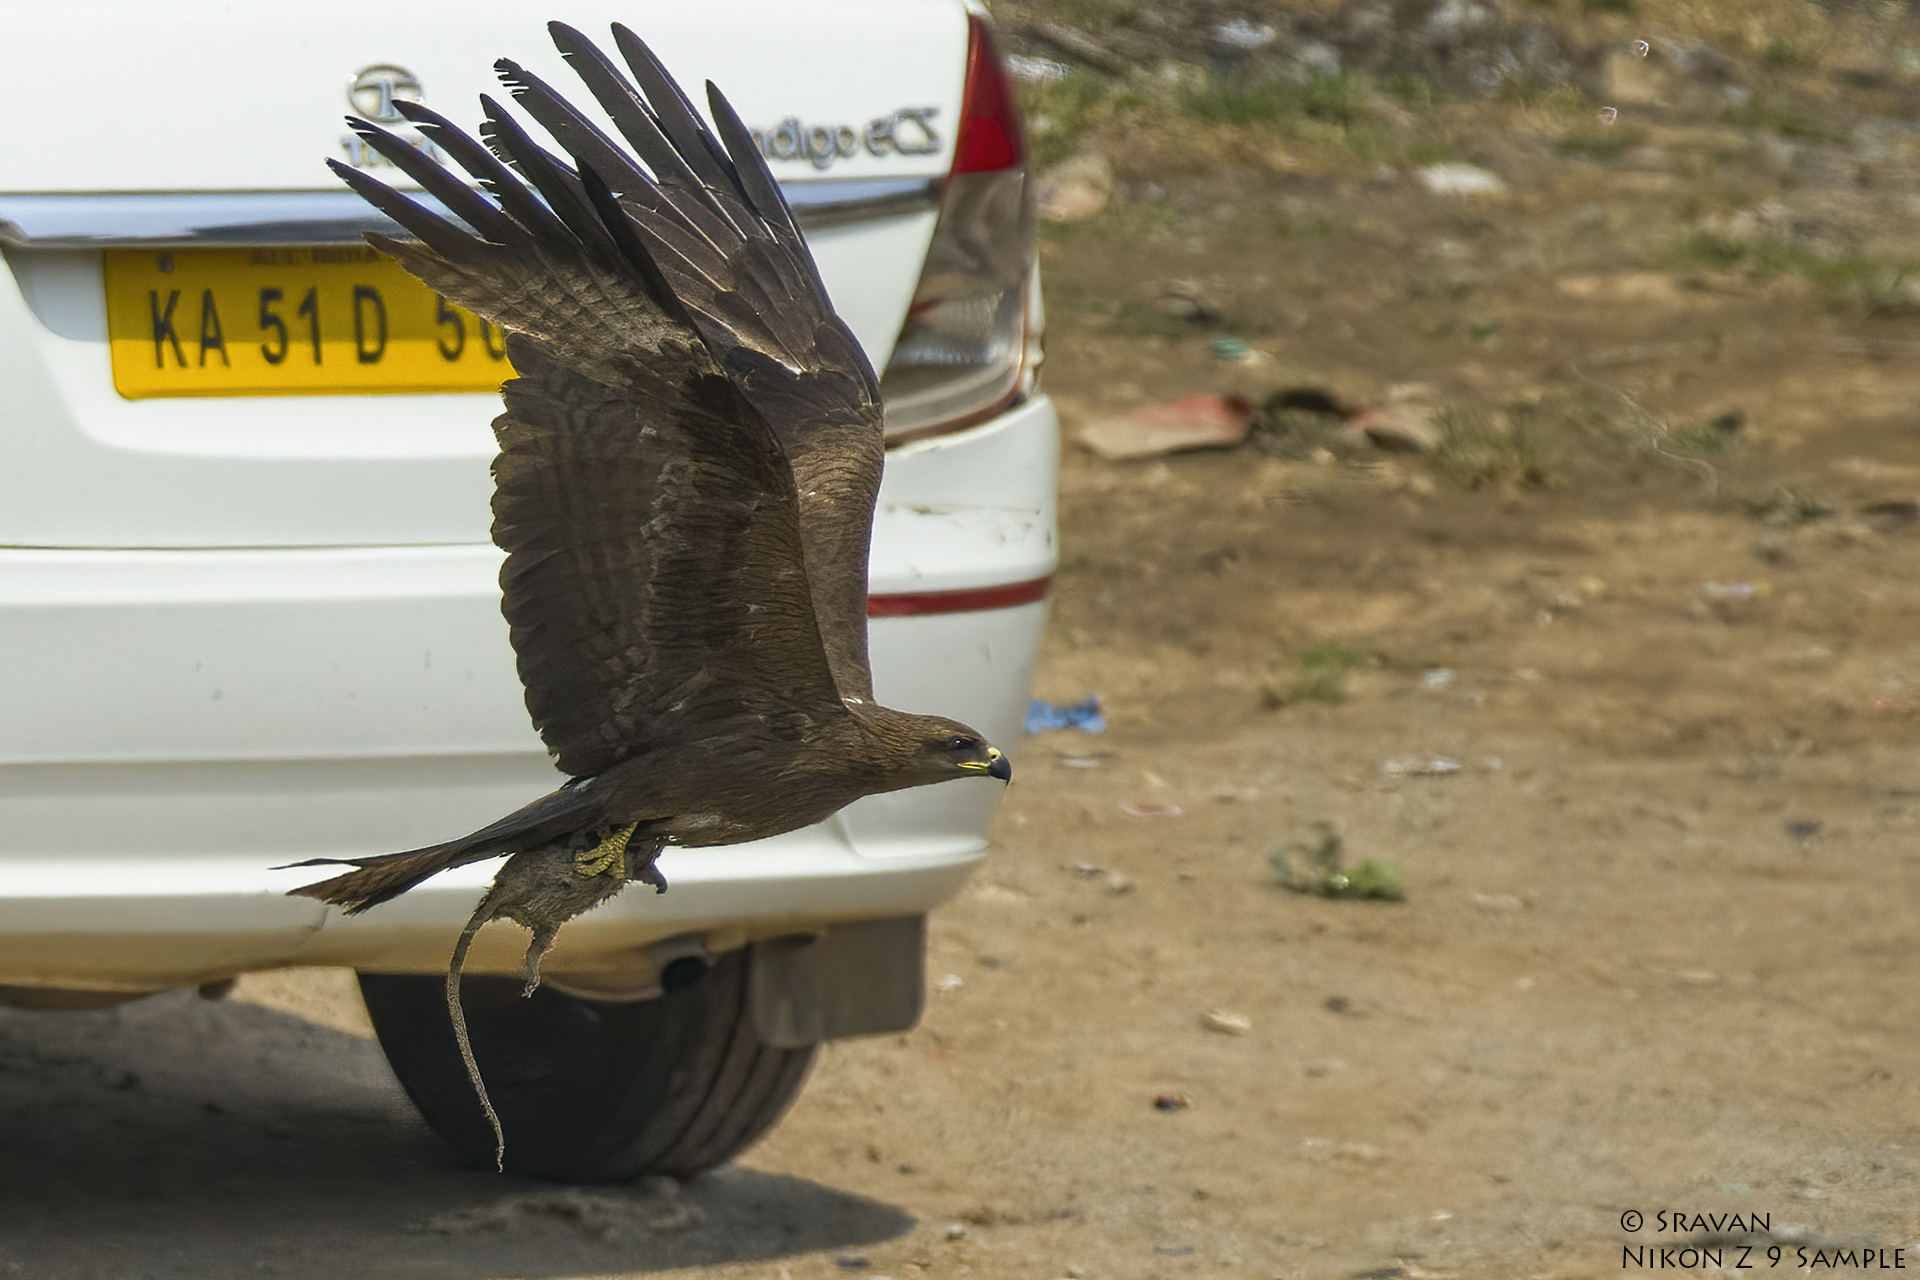
Dynamic-area AF (L)
Dynamic-area AF (L) is used to capture the below images.
Dynamic-area AF (L) is excellent to capture fast action. It’s initial focus acquisition is almost instant. But this varies from lens to lens and is also influenced by the subject distance. Z9 locked the focus instantly with Sigma Sports 150-600mm lens across all the distances but struggled to focus at 60 feet distance with Nikon AF-S 200-500mm f/5.6 VR. It locked the focus instantly at other distances though with Nikon AF-S 200-500mm f/5.6 VR.
Eye AF


Overall Auto Focus performance
Nikon Z9 offers excellent auto focus when right settings are used. We should make sure we minimize user errors. Z9 AF combined with 20fps enables photographers getting more keepers to select the best from.


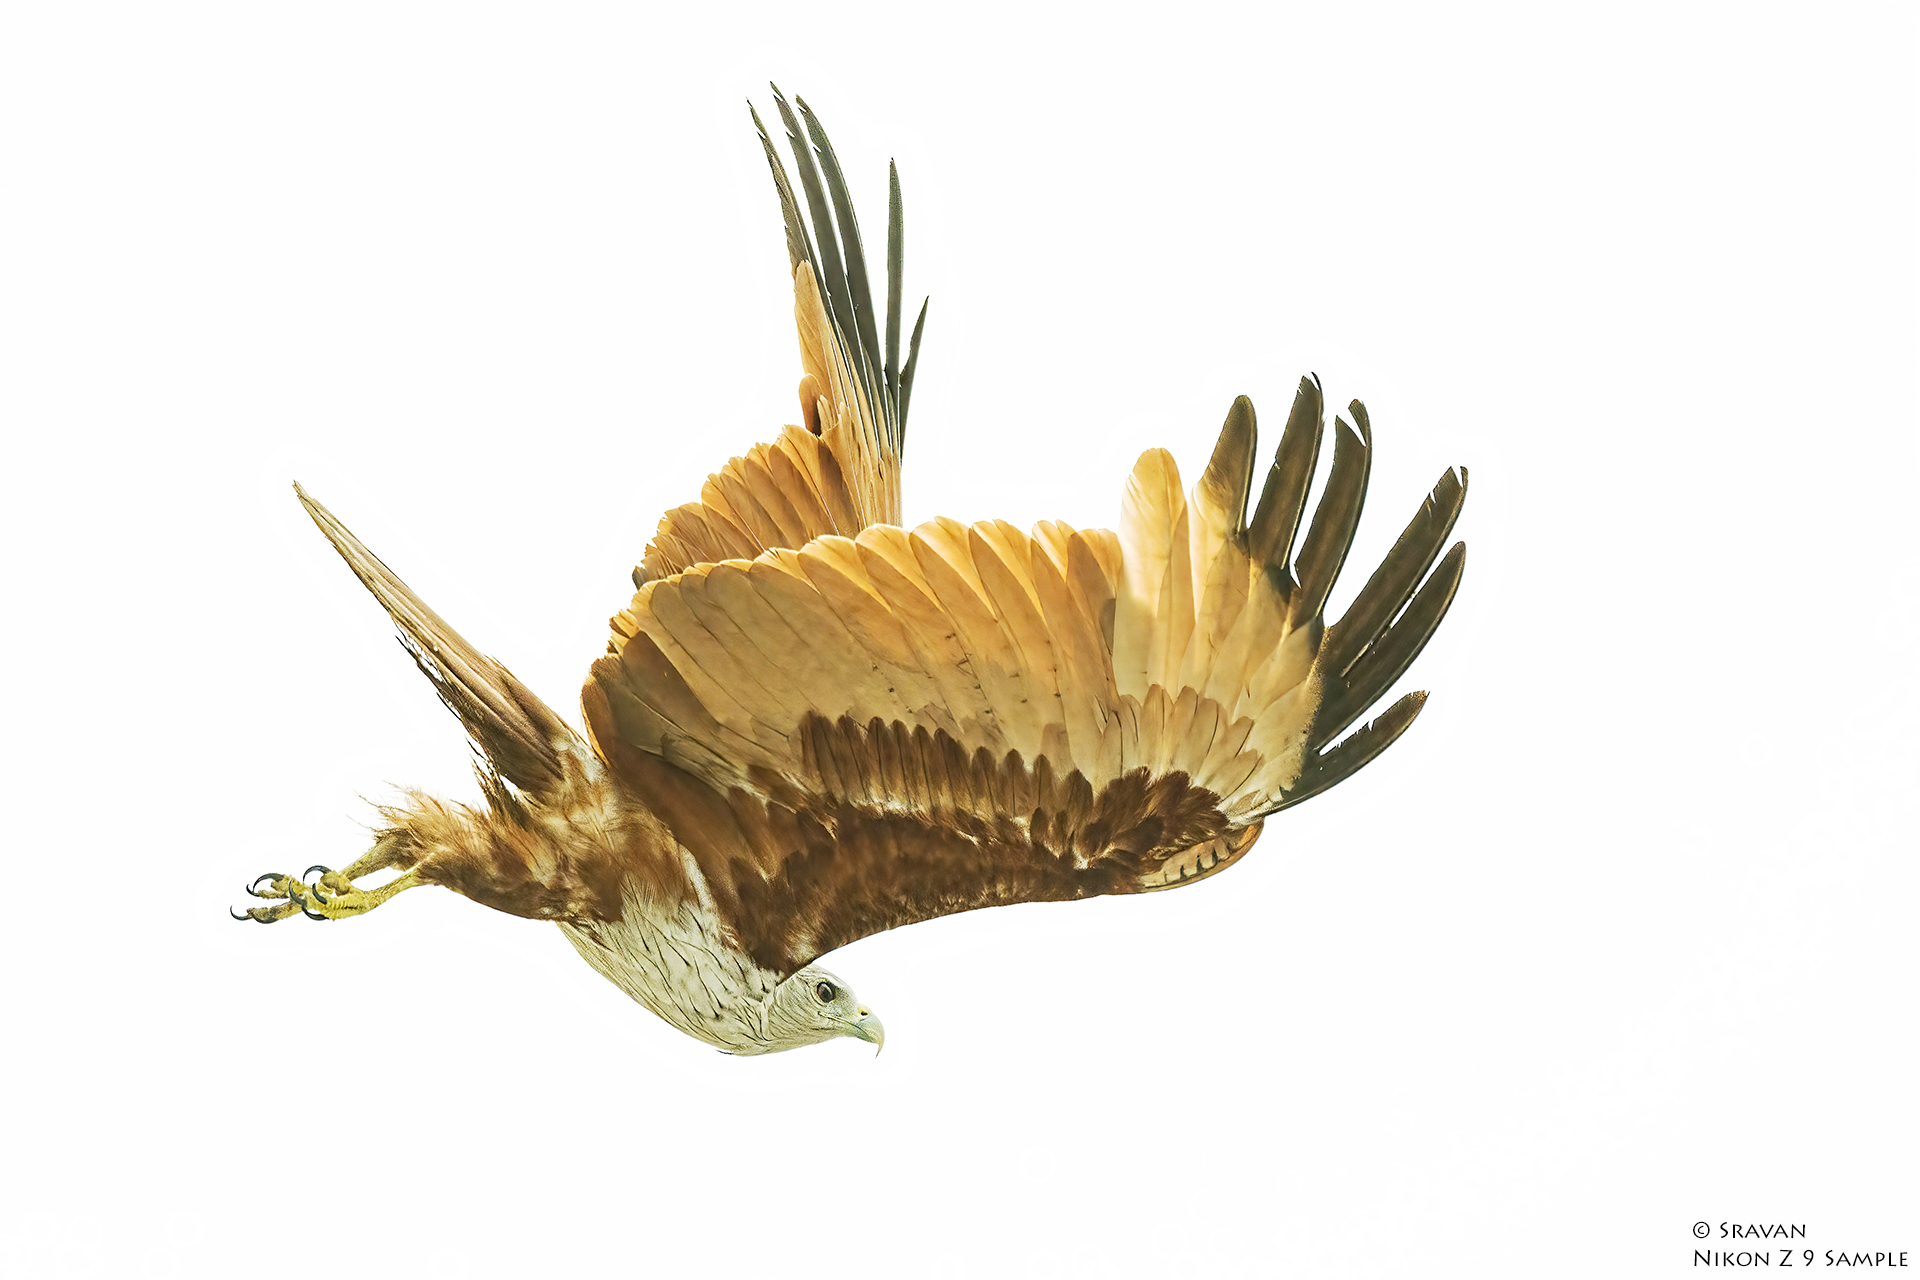
This high key image was taken with Nikon 200-500mm VR lens.
Auto Focus recommendations
- If you want only one setting all the time for wildlife, then use 3D tracking AF. You can assign this to AF-ON button.
- If you want instant focus for birds in flight without reacquiring focus, use Dynamic-area AF (L). Assign this to one of the buttons as per your convenience.
- Post firmware update 2.0, Wide-area AF (L) is no more required for initial subject acquisition. It is never good for birds in flight when used alone. Please avoid this for anything related to action.
- Always keep Single point AF handy by assigning to a button.
Image Quality
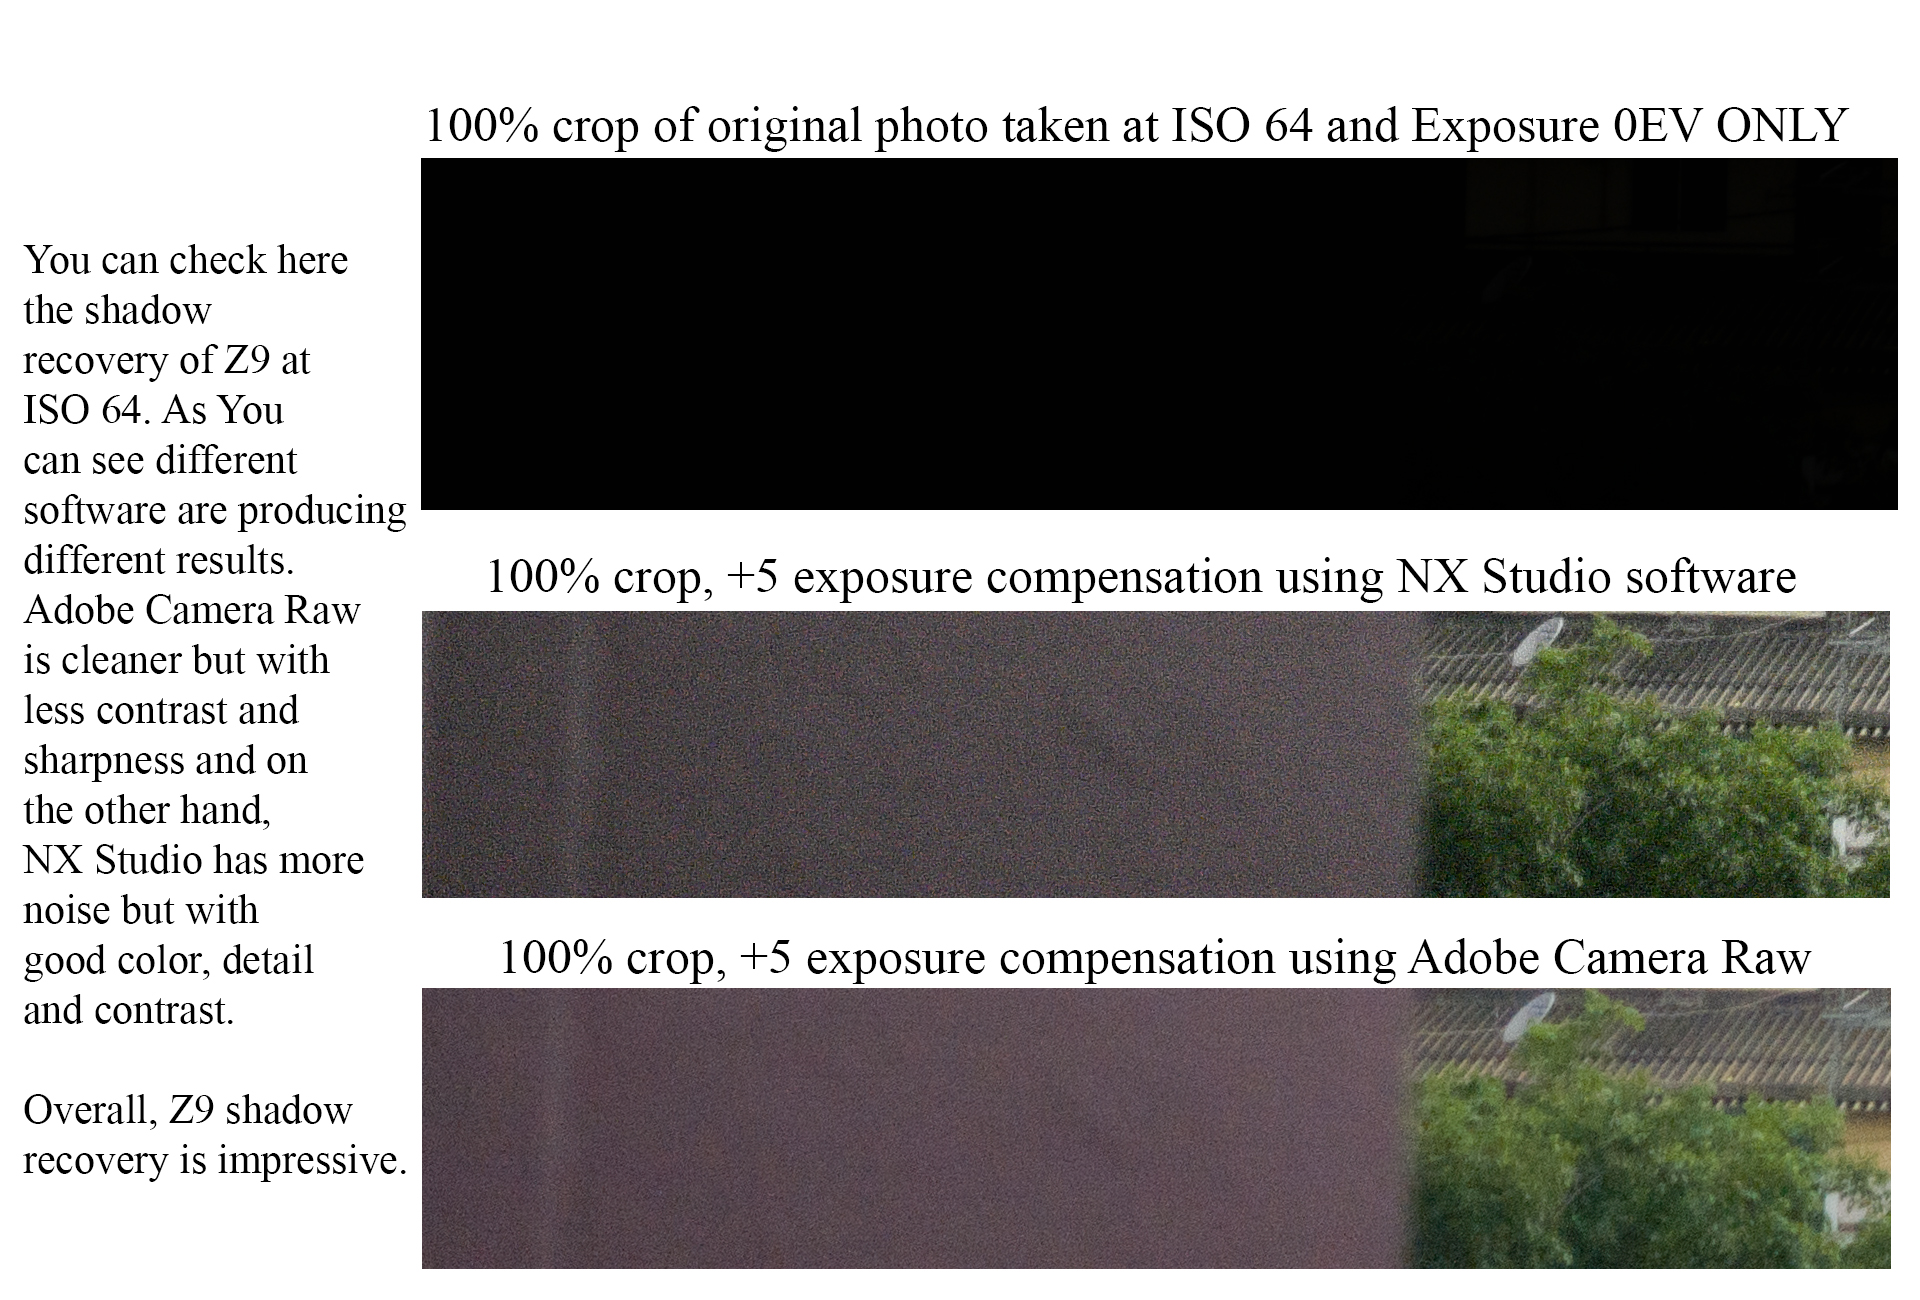
As everyone knew by now, without the low pass filter, Z9 with 45 megapixels produces sharp photos. The base ISO 64 is great for shadow recovery and also to get the best image quality out of Z9 when required. High ISO performance is a known trade off for that resolution at 45 MP.
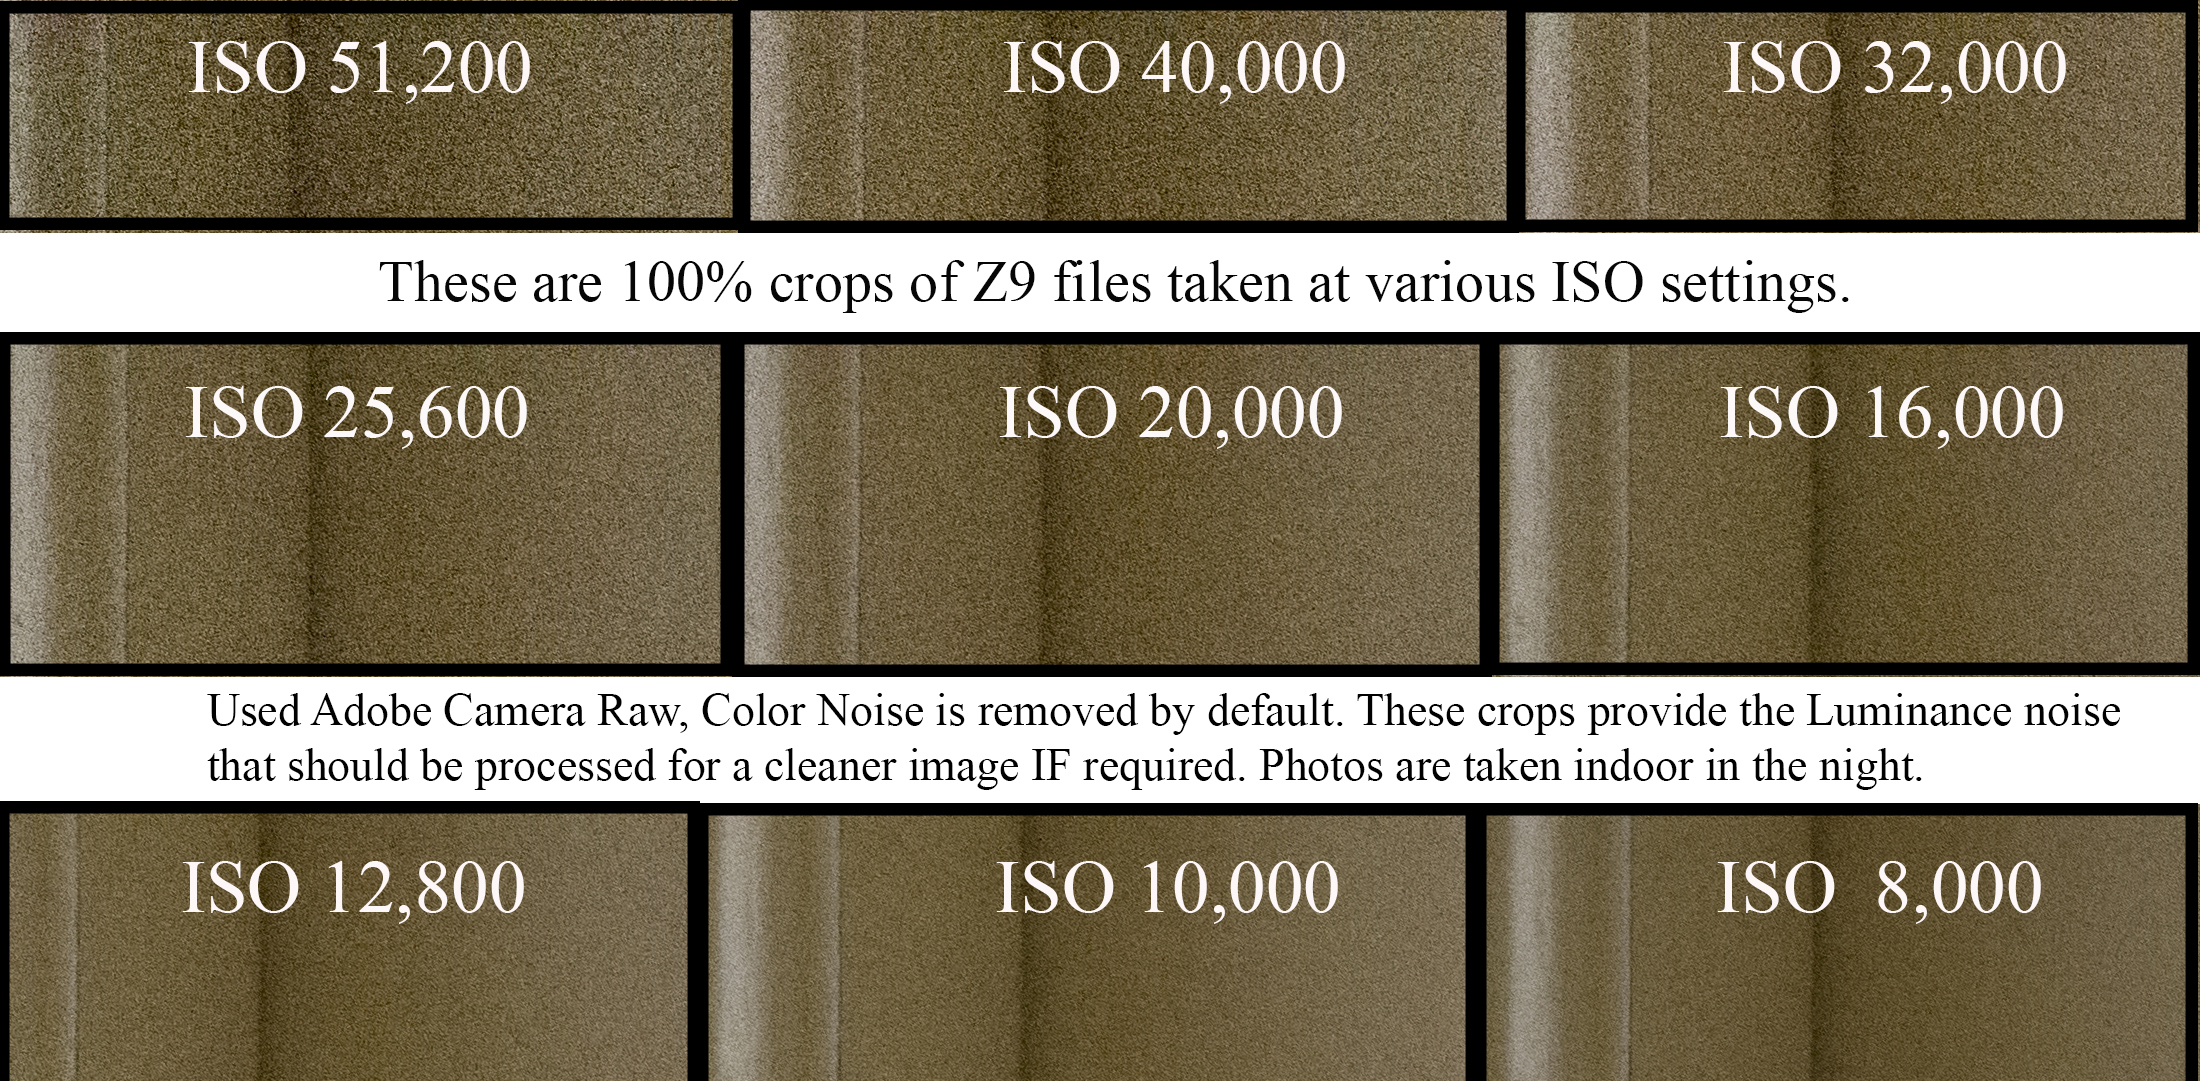
HIGH ISO
Using noise reduction software, one can process as per their requirement. I use Topaz DeNoise AI (latest version is supporting Z9 Lossless Compressed RAW) and I am able to clean the noise till ISO 25,600 by moving the noise slider all the way to 100. Beyond that ISO, DeNoise AI gave up. So I have changed my workflow a bit to get cleaner images. I was confidently using ISO 16,000 in Nikon D500 and ISO 40,000 when really required. Now I doubt that is possible in those situations with the Z9. I need to wait for few more months to confirm this. But I can say today that ISO 12,800 is usable in low light with right exposure. I do have Capture One which supports Lossless compressed RAW files but it won’t recognize ISO 102,400 files!
Please check the below image for the amount of noise one can get at high ISOs in an average case.
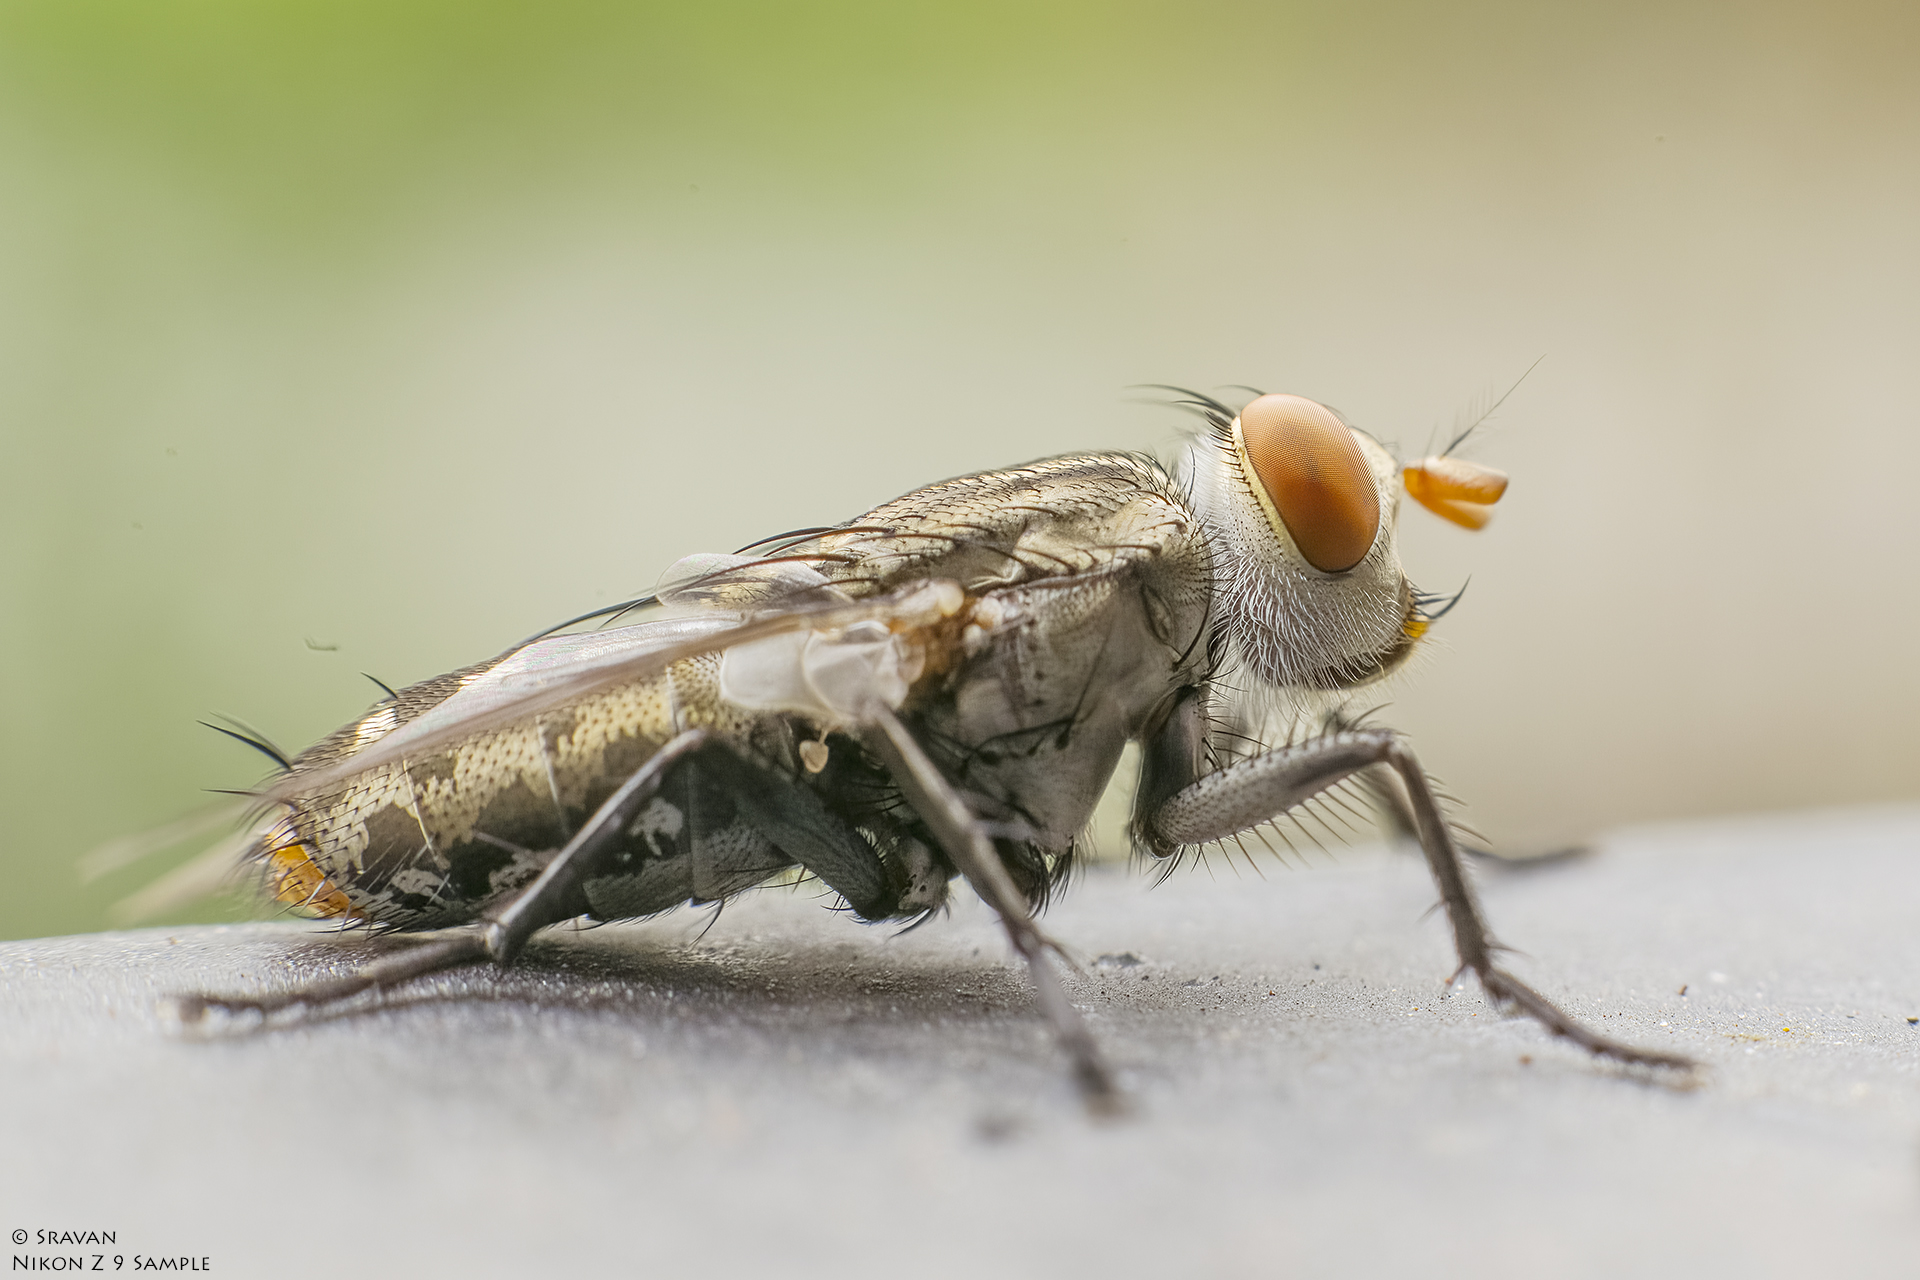
ISO Recommendation for Macro Photography
- I recommend ISO 400 or below for macro photography as anything above may take a toll on fine details.
- With selective processing, ISO 3,200 can be used but at the cost of fine details. So depending on the subject and importance of retaining the fine details, select the ISO.
- Prefer to avoid opening up shadows at ISO 800 and above.
ISO and Print sizes
Without any post processing, photos taken with correct exposure which includes dark to very dark backgrounds, one can print the photos at the below sizes.
- ISO 8,000 – 12×15 inches prints without any objectionable noise
- ISO 16,000 – 7×10 inch prints without any objectionable noise
- You can calculate the print sizes at other ISOs as per the above print sizes
In good light or with careful noise reduction, print sizes can be much bigger. The above observations are somewhat similar to Nikon D800E print sizes which I have published few years back HERE.
processing Flexibility

Extreme Caution: My sincere suggestion is not to look/take photos of Sun directly without taking enough precautions.
Detail
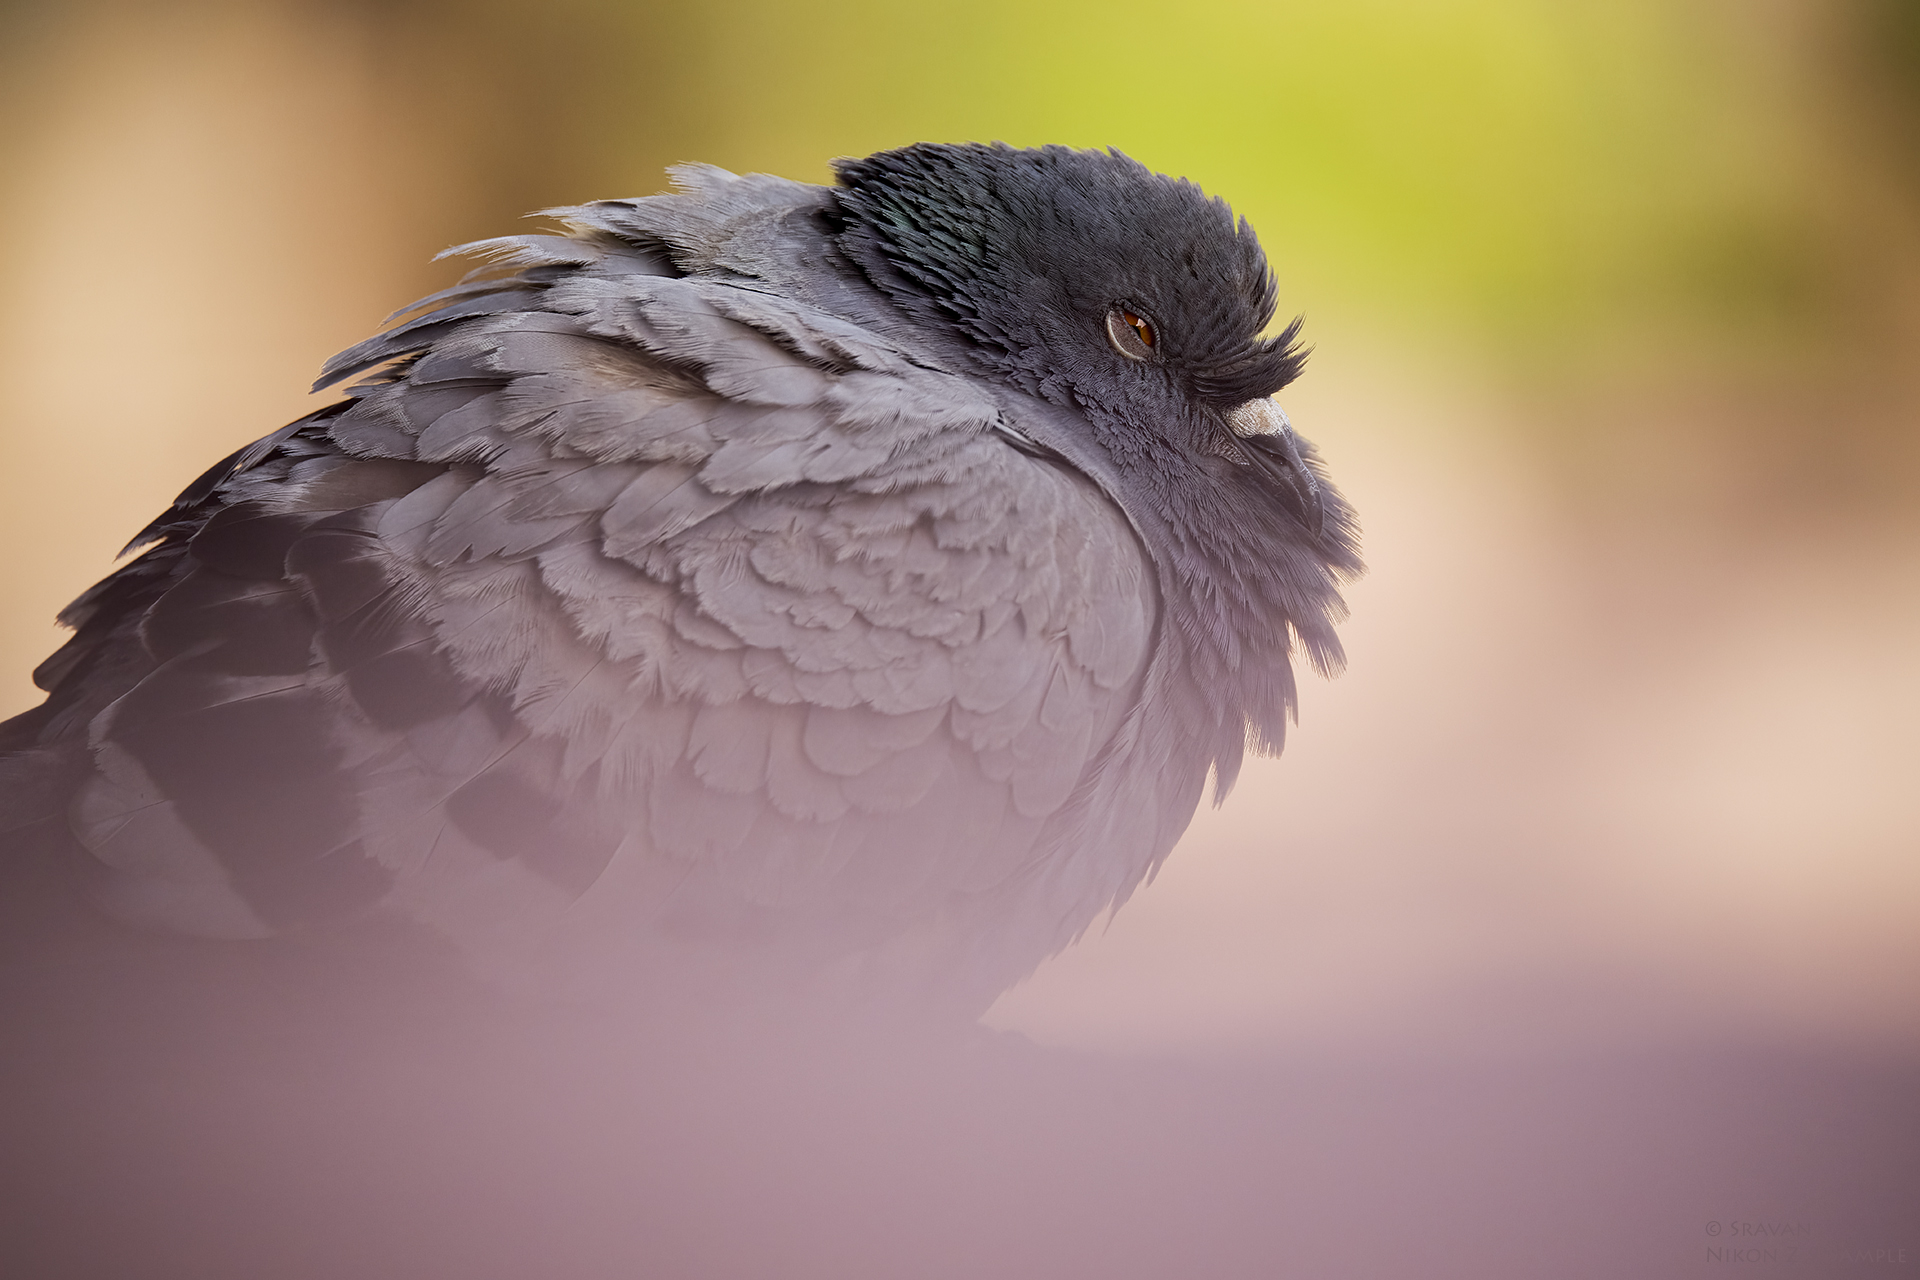
I am yet to see that wow factor of details getting out of that 45 megapixel sensor, partially due to my expectation compared to Nikon D800E with 36 megapixel which I was shooting with and also because of my current lens selection. In general, Z9 produces sharp images with excellent contrast even when shot in back light. 45 megapixel resolution is excellent for wildlife photographers as there will be ample of room for cropping and still can get 10″x15″ or 12″x18″ (inches) prints which are not possible with lower resolution cameras with 20mp/24mp etc. in the same conditions.
Lossless Compressed RAW (vs) High Efficiency*
In my workflow I noticed that Lossless Compressed RAW images are not that flexible in post processing whereas High Efficiency* (HE*) are extremely flexible like my other Nikon DSLR RAW files. Strange though as HE* is supposed to have lesser data compared to Lossless Compressed RAW to process with. So, for now, I am using HE* as a default.
Caution: As mentioned above, please take all precautions while shooting Sun. Using Live view is a better option.
Highlights & Shadows in Lossless Compressed RAW
Watch for highlights! It’s tricky to recover highlights unlike Nikon D500 or Nikon D800E as per my experience. As per my standard workflow which I am following over last 8+ years, it’s a two step process to recover all the highlights of Z9 as desired while shooting in Lossless Compressed RAW. As mirrorless cameras are offering real time exposure information in the view finder, it is easy to nail the exposure while taking the photo without risking losing the highlights. Shadow recovery is much better. Even opening darker areas especially for birds in flight, shadow recovery did not introduce any objectionable noise.
Controls and layout
The first thing I checked Z9 is for its grip. It fits perfectly in my hands. Though Z9 weighs more, it balances well. Though I am still struggling to find the “Menu” button most of the times, overall familiarity is just like using any other Nikon DSLR. After using the Z9 for one and half day, I realized that I didn’t see the camera front button layout though I customized them in banks. Then, when I saw, I realized that the lens release button is not semi-circle! This tells how easy it is to use Z9 after years of use of Nikon DSLRs like Nikon D500/Nikon 800E/Nikon D90 etc.
Sigma Sports 150-600mm lens is more balanced on the tripod with Nikon Z9 than Nikon D500. So additional weight is an added advantage when used with super telephoto lenses.
Customization
Z9 allows lots of customization. We also can wish to have some additional options to change the minimum shutter speed/maximum ISO value for the Auto ISO. AF customization is possible through various buttons and sub dials. So please explore all possible options as per your requirement. I customized 3 buttons to my needs just for AF within each bank and we can do much more.
At a high level, we can customize buttons specific to video, photos or playback. There are ample of options.
Buffer
Buffer is as below with a XQD Card (Nikon XQD Card with read speed 440MB/s and write speed 400MB/s, bundled with Nikon Z9 in India).
Uncompressed RAW – I got 39 photos (at 20 fps) with 0.05 seconds between the shots and then the shot to shot duration had increased to 0.16sec (6 fps) but camera did not stop for buffering.
High Efficiency* – I got 60 photos in 3 seconds (at 20 fps) and 6 photos in next 0.8 seconds (at 7.5 fps) but camera did not stop for buffering.

Flash Photography
Please select OFF for “Silent mode” for Flash Photography. Please follow the instructions as per the Nikon Z9 manual from page 422.
FTZ Adapter II
Other than the additional size and weight, there is no other issue using this. All my F mount lenses (both FX and DX) are performing flawlessly and the AF is spot on even with third party lenses (my Sigma Sports 150-600mm focuses much faster than the Nikon’s own 200-500mm VR). This eases the stress to buy Z lenses on a priority unless needed that extra quality and versatility. As I mentioned above, I took all the images in this article using FTZ Adapter II. The only Z lens I pre-ordered is 800mm PF.
Viewfinder
For me, viewfinder is just great with zero blackout. Over 10,000+ photos which I have taken using Electronic viewfinder, I did not notice any drawbacks that are worth mentioning here. I did not miss any shot due to any viewfinder issue. New 120 Hz refresh rate is providing smoother view finder experience in some use cases. I am not missing optical view finder and I can’t appreciate my Nikon D500 viewfinder anymore due to the bright Z9 viewfinder.
Built-in AF-assist illuminator
Great to have for my workflow. I shoot once in a while portraits in total darkness with flash using camera focus assist for creative lighting. This is a welcome addition to Z9. Z9 AF assist light is very bright compared to Nikon D500/D90. Below information may help to setup this quickly.
- Better to select OFF for “d9 Starlight view (photo Lv)” while using this.
- Use AF-S focus mode.
- Avoid lens hood if possible.
DX lenses
- View finder will automatically be updated with the corresponding DX view when a DX lens is mounted or DX area is selected for a FX lens.
- DX lenses can’t be used in FX mode like other full frame Nikon DSLRs (like Nikon D800E etc.). DX lenses are strictly DX lenses on Z9.

Battery Life
By disabling GPS & Monitor and keeping “Airplane mode” ON with no “Camera sounds” & “Silent mode” OFF but with no “Standby timer”, I am able to get 3000+ photos with heavy image reviews, changes to menu and image deletion. For me, this is good. I always prefer additional battery which gives some time to charge the used battery. Battery charging may take 2-4 hours if not fully drained, so we should plan some time for battery charging.
future Firmware Fixes
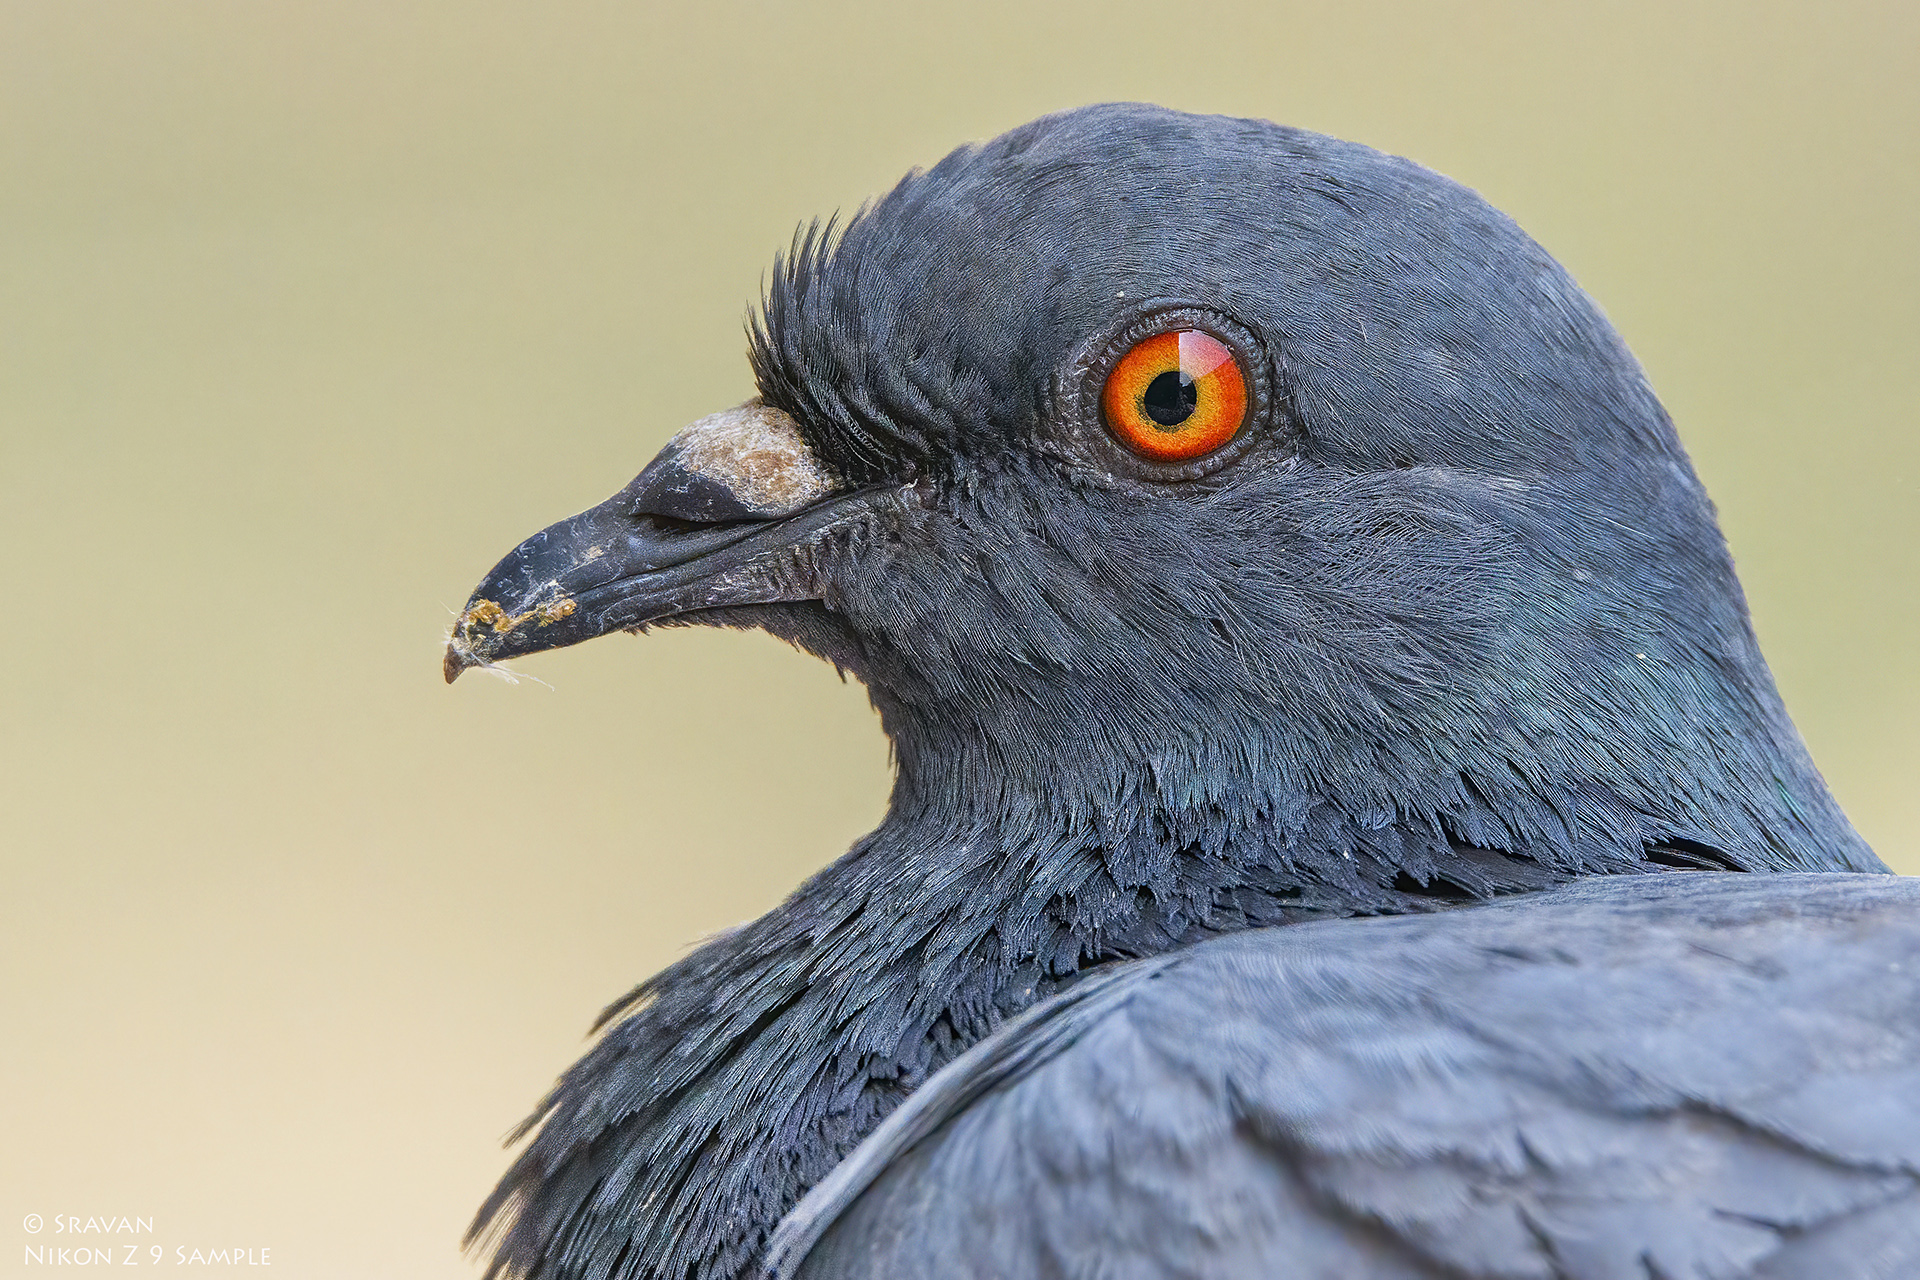
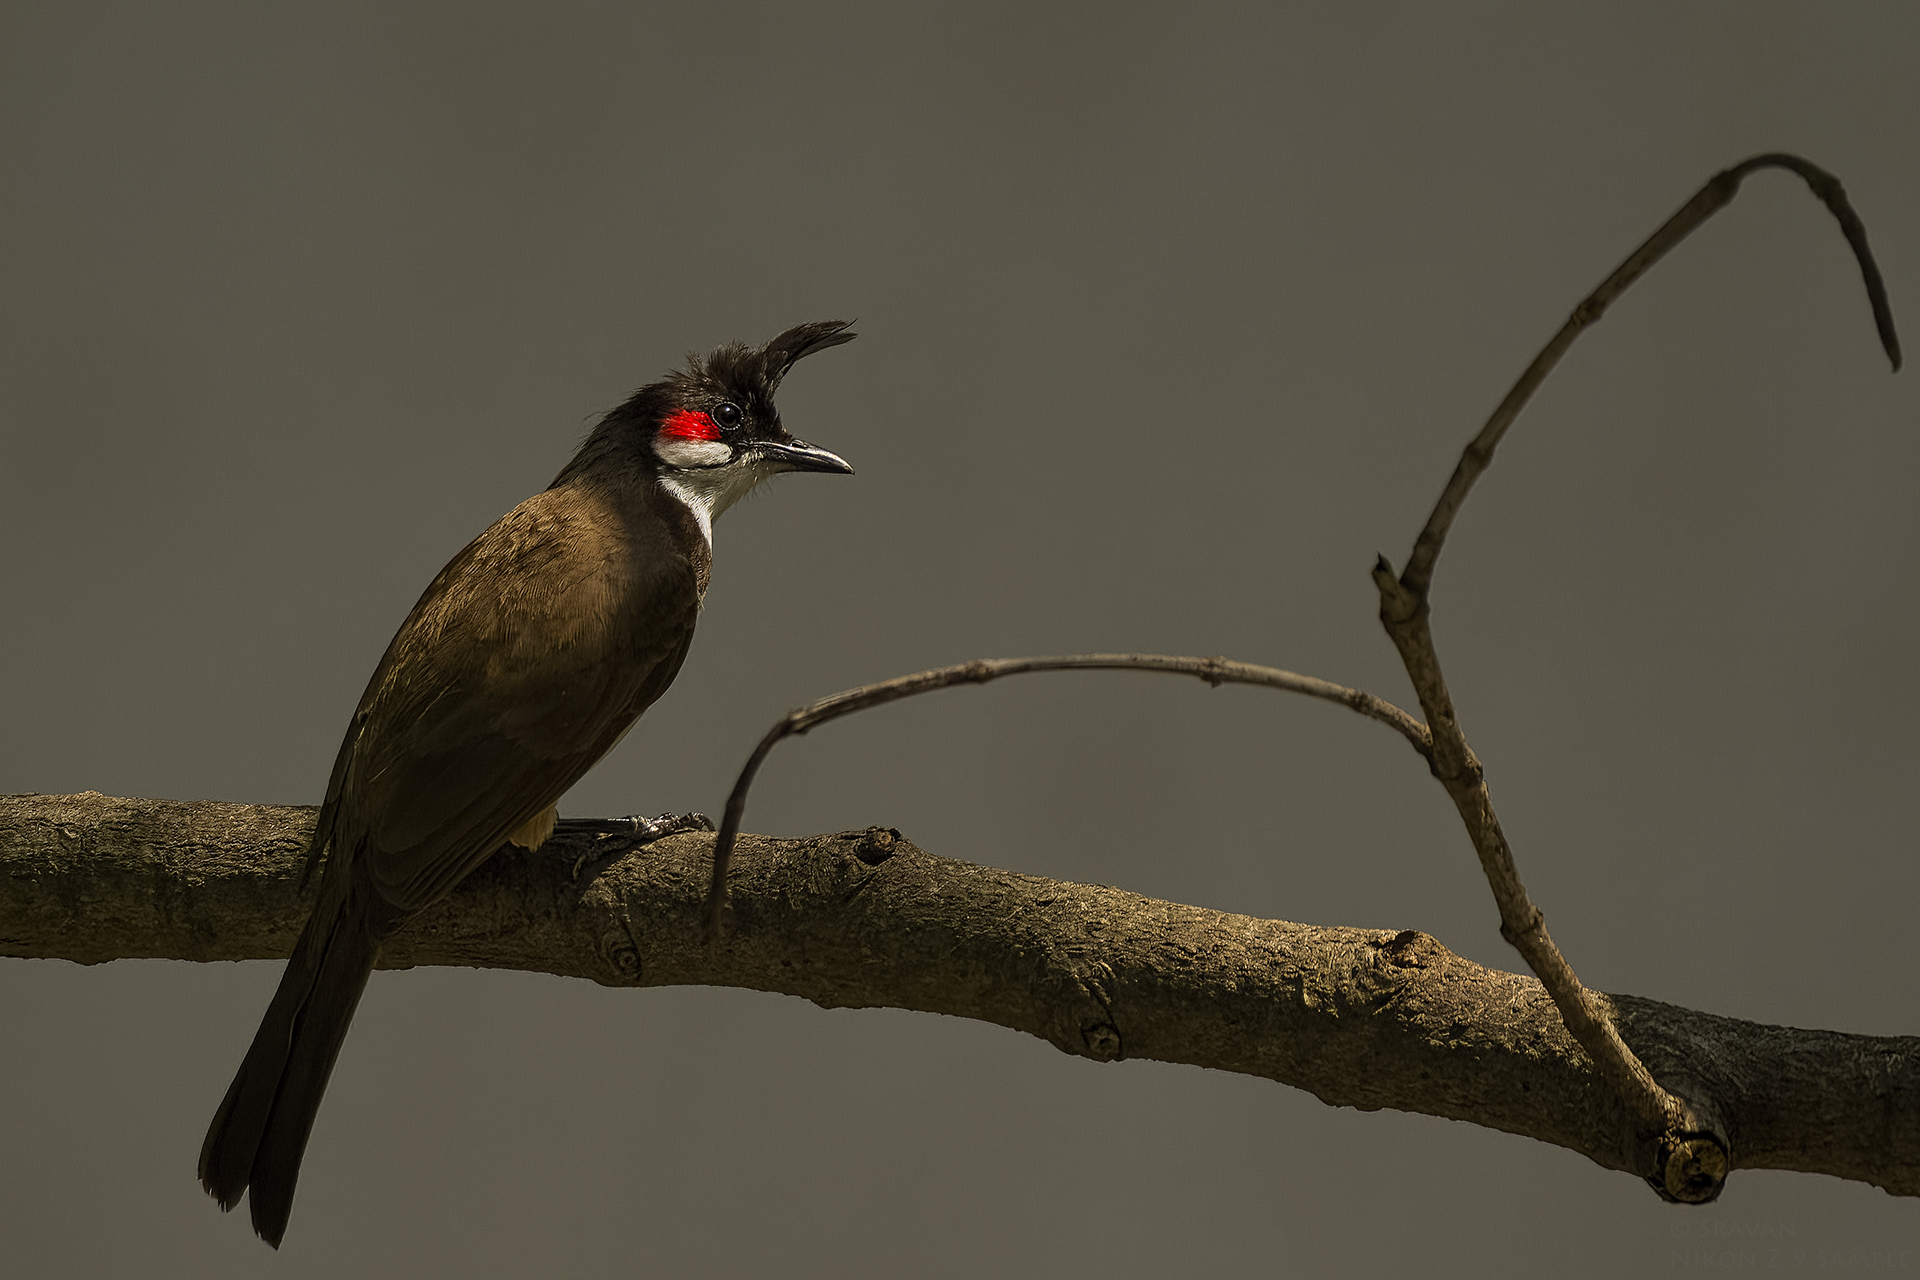
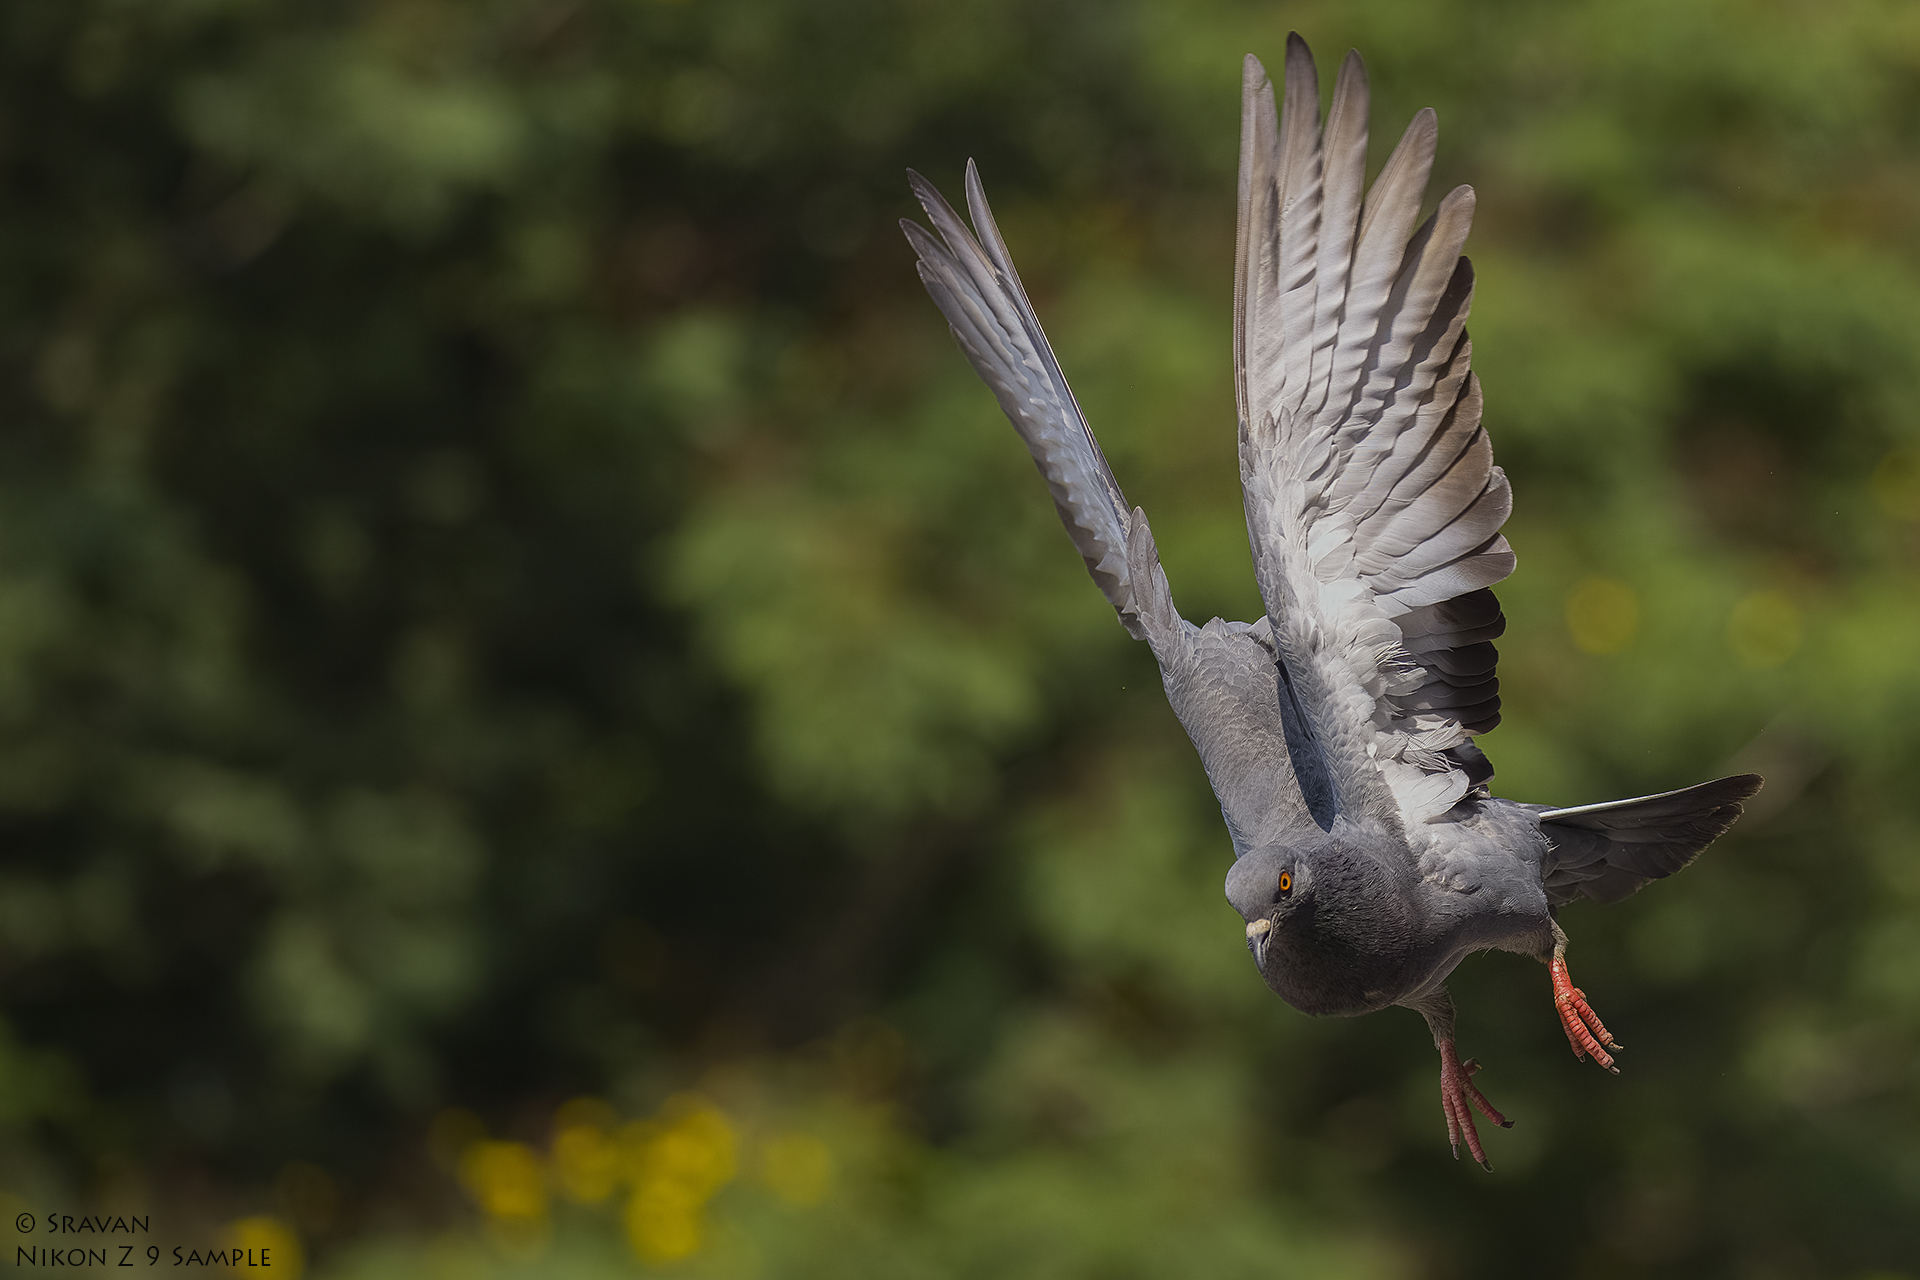
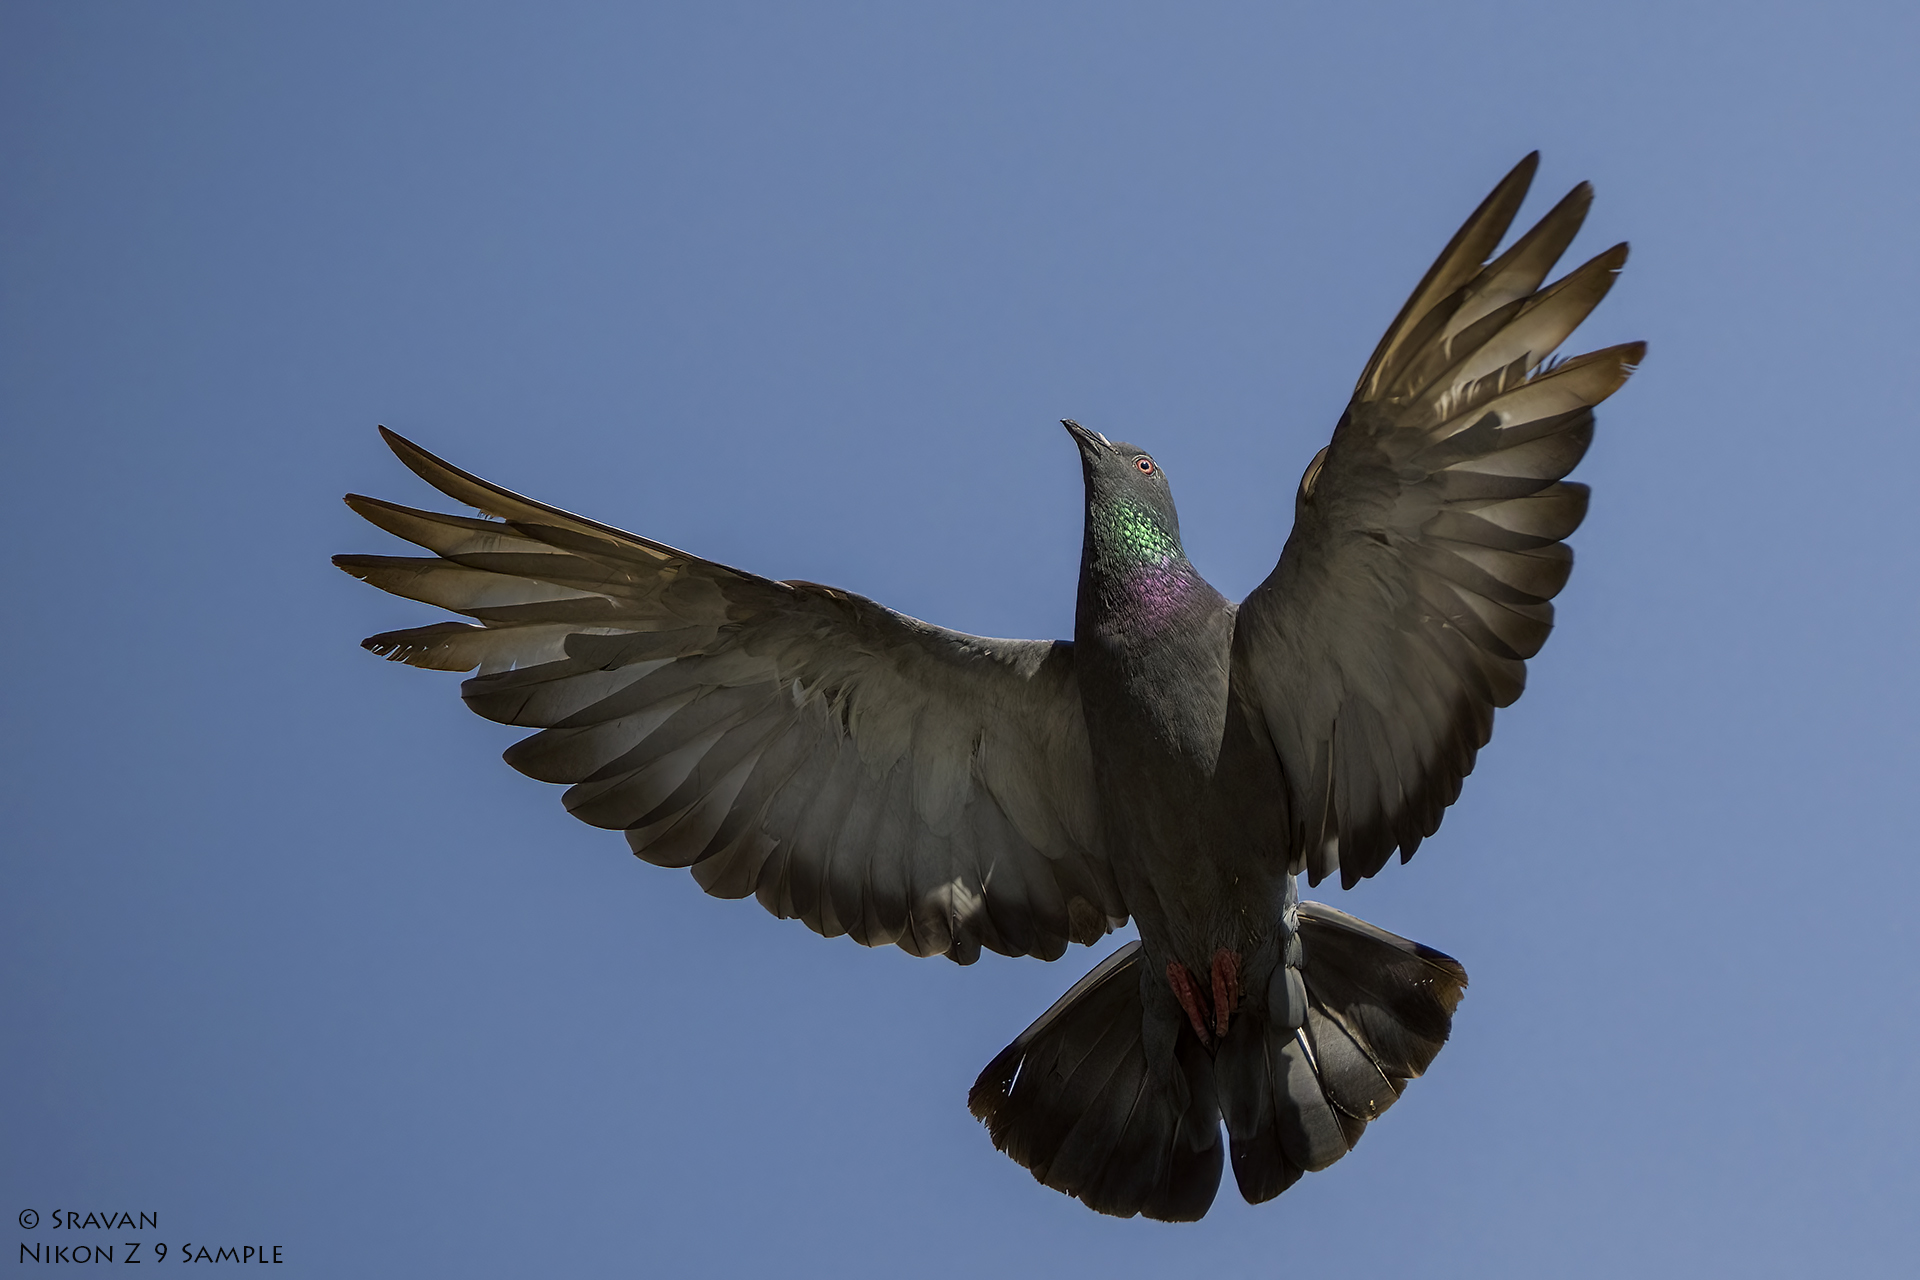
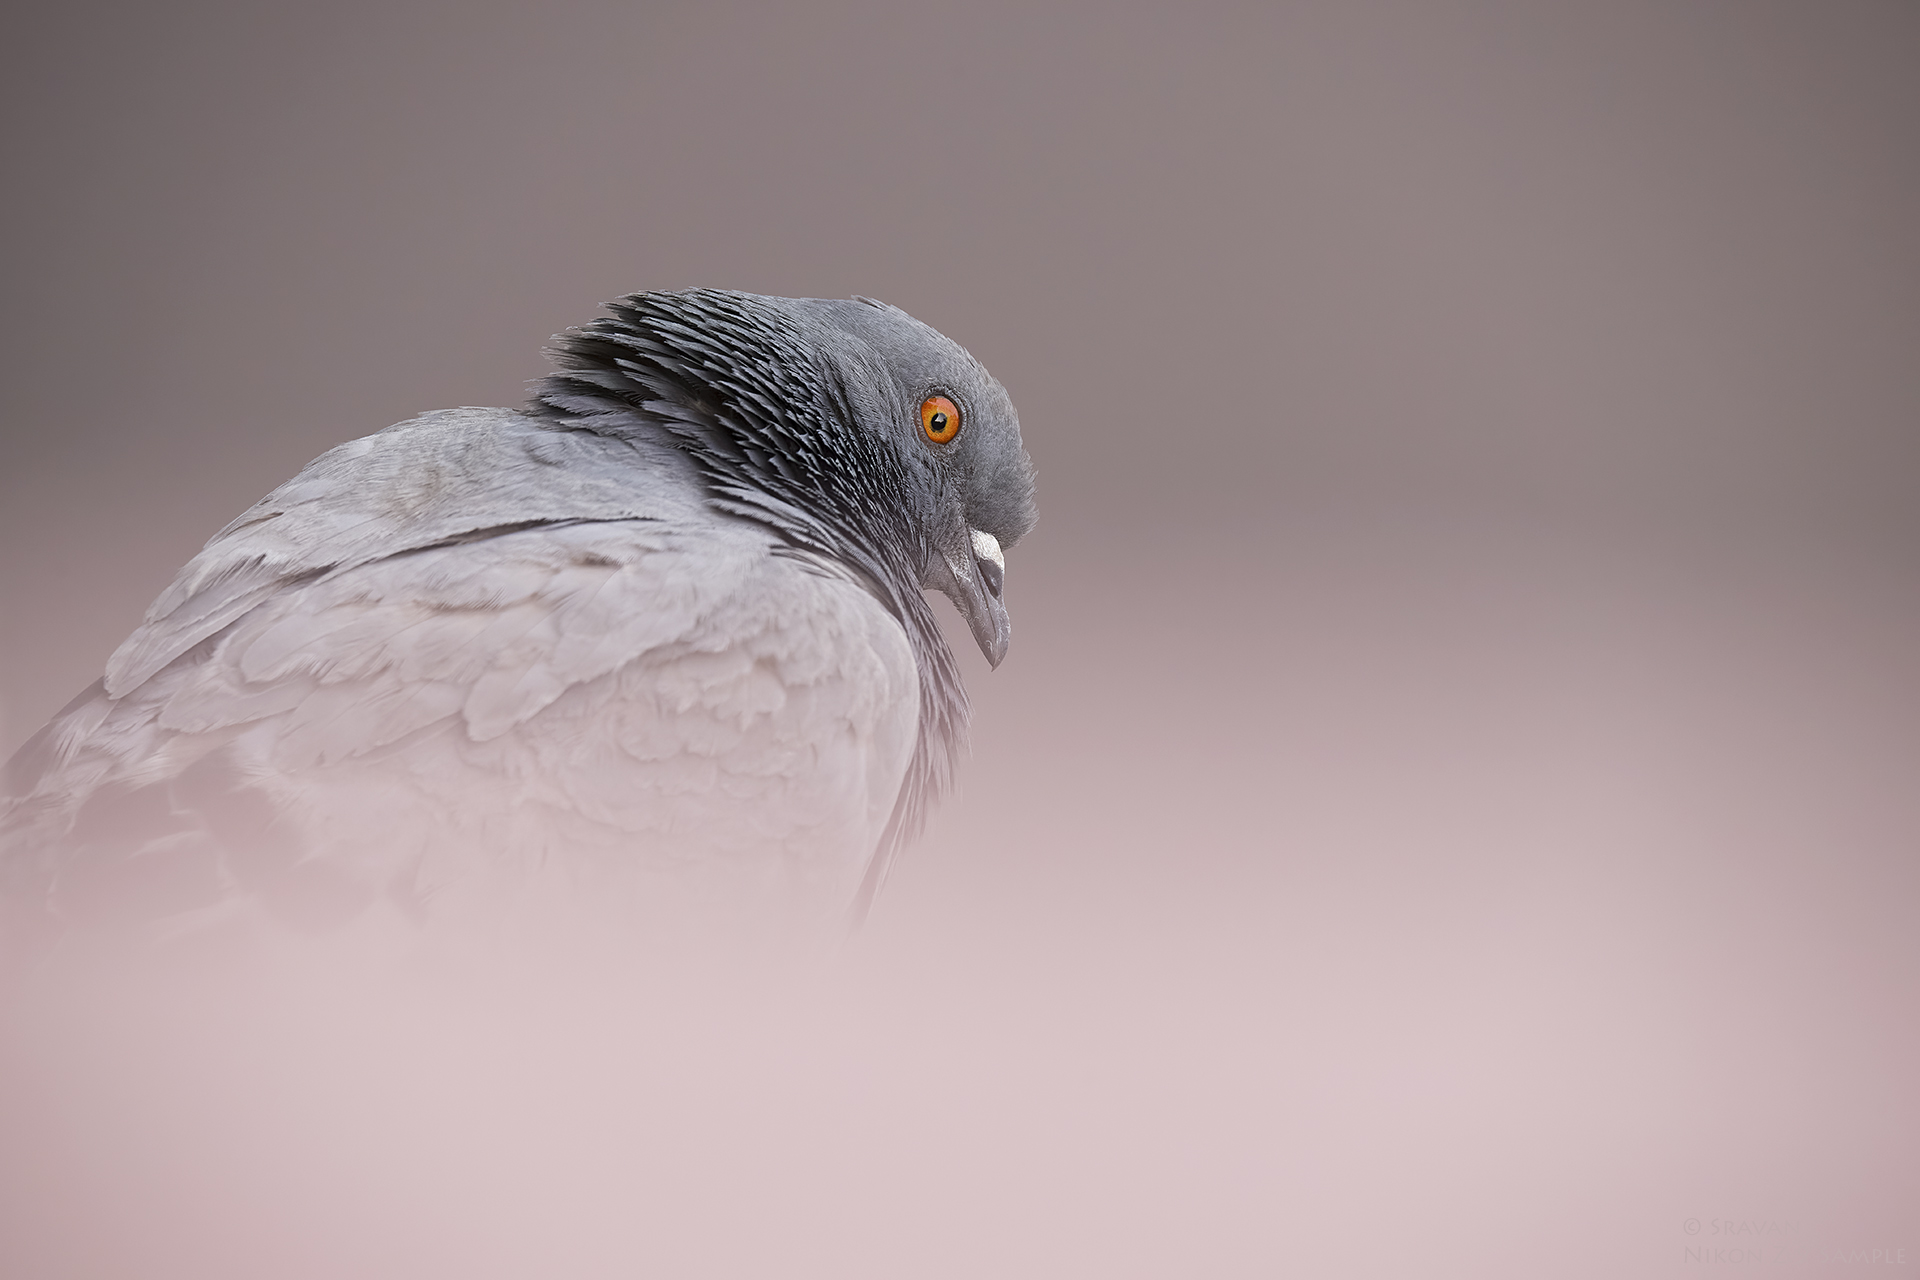
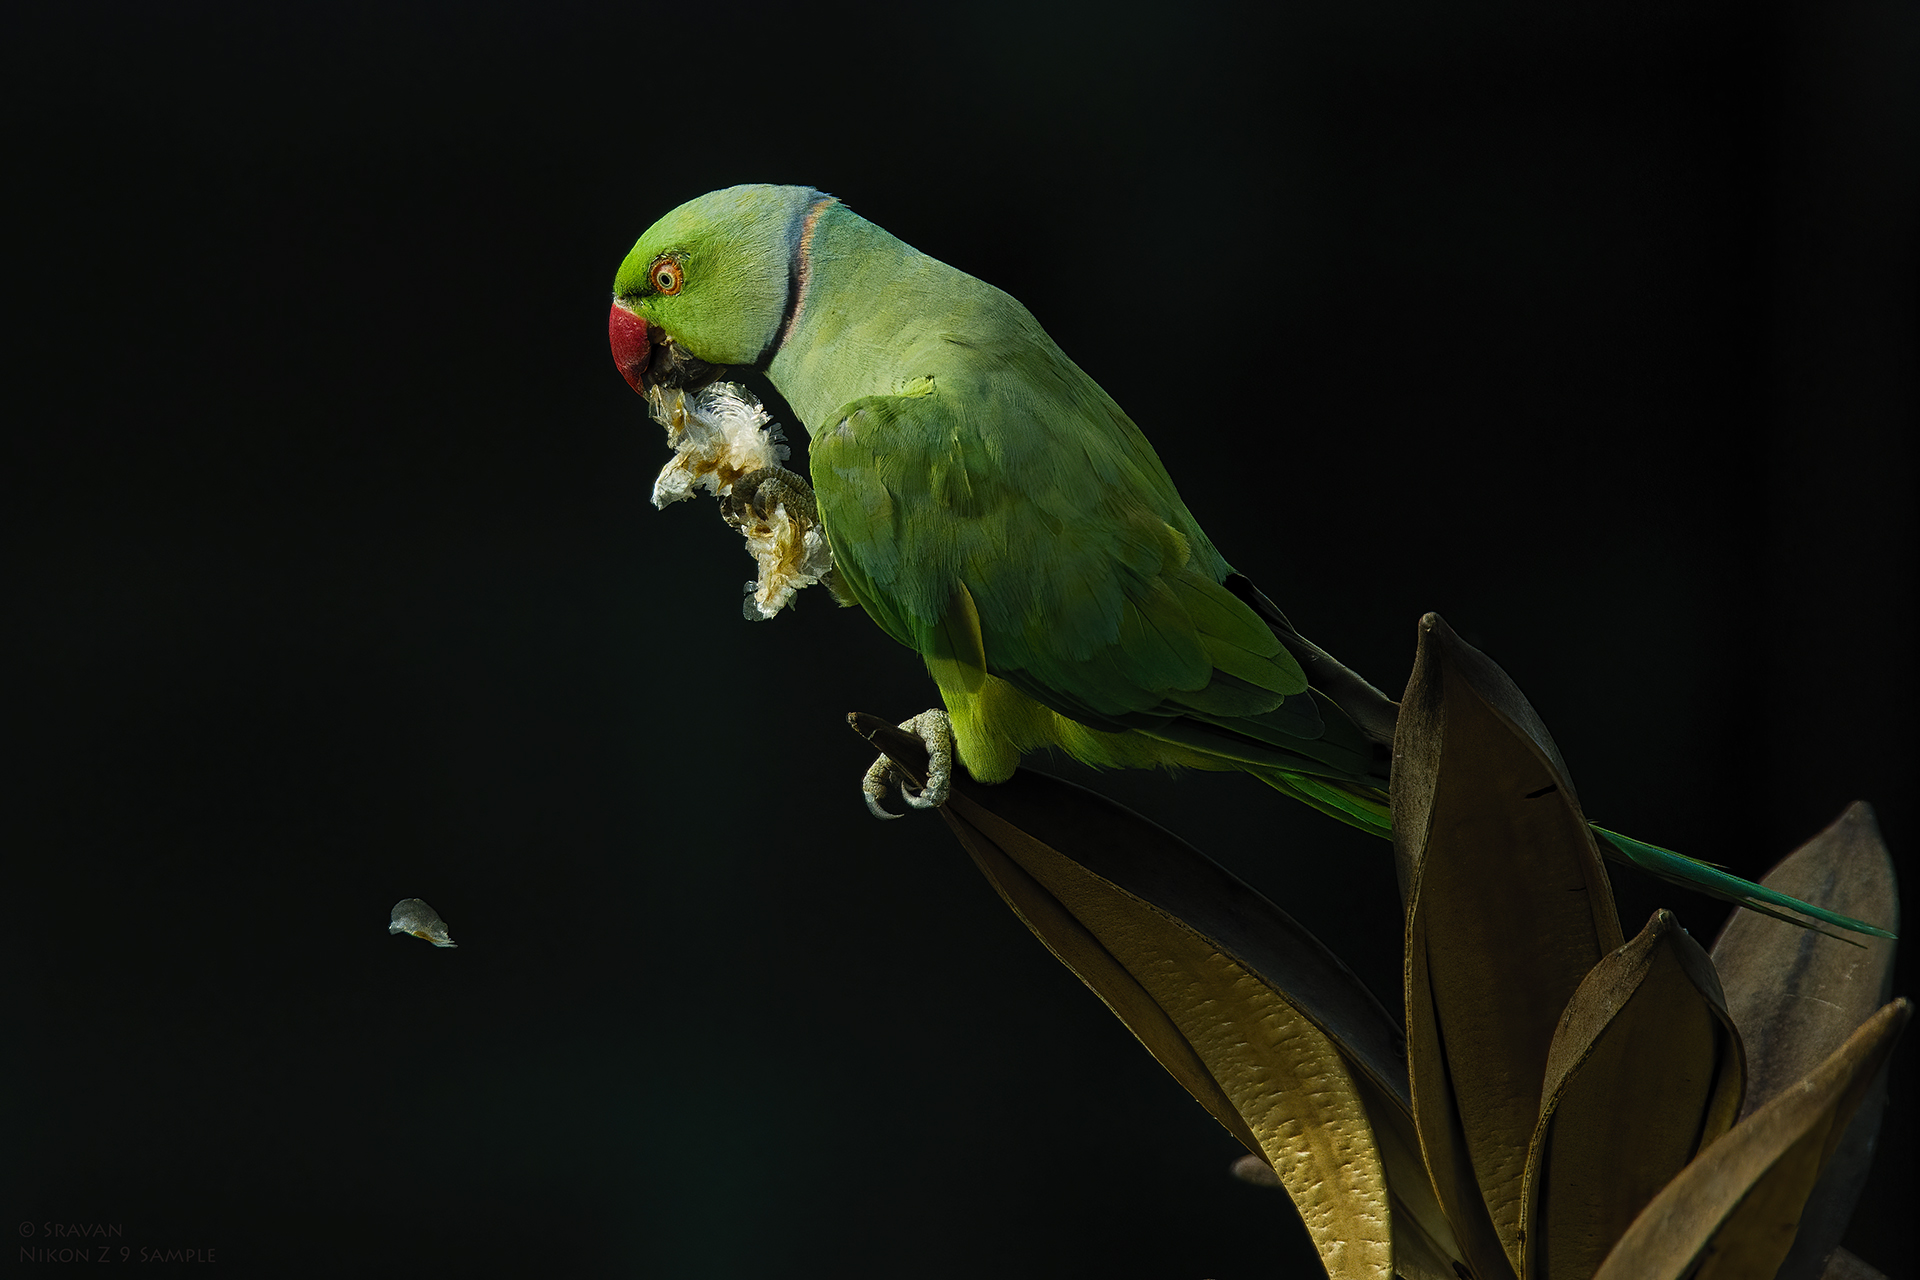
- Scope to improve subject detection in lower contrast or even when the subject (Rock Pigeon in this case) is in shade on a bright sunny day. In the above scenarios, Z9 was focusing often on Pigeon’s tail than the head though the head is nearer and facing towards the camera despite the subject detection is set to Animal only.
- Wide-area AF (L) or 3D-tracking AF are unable to detect subject (White-cheeked Barbet & Asian koel male in this case) despite the subject detection is set to Animal when the subject is not openly perched. AF-S, Single point AF works here flawlessly, which is as expected.
- Dynamic-area AF (L) failed to lock on the bird within the branches and focused on the nearby leaves. Ideally, this should work the same way Nikon D500/D800E AF works considering the selected focus point.
- Still there is a scope to improve 3D-tracking to acquire the focus for birds in flight at closer distances where the bird is visible at least for a second in the view finder. Though it seems like a more demanding request but not exactly in a practical case where the AF actually locks in this duration for a static subject.
Firmware wish list
- If possible, should include subject detection for Dynamic-area AF as well. This helps in cases where the focus can be on the face of an animal than on tail/body/wing. As a work-around for now, using smaller aperture will work with some compromise.
- More shooting menu/custom settings banks options will help as it looks more as a software update than the hardware. At least as per my needs additional 4 will help (total 8).
- Additional Dynamic-area AF (XL) which covers all focus points like in DSLRs (like 153 points option in Nikon D500).
- Option to assign button(s) to change Custom Settings Banks in custom controls like how it is provided for Shooting Menu Banks. At least one button changing both of these is also fine to some extent than none.
- To avoid confusion, Menu options for Video can start with “V” like “V1 Shooting Menu Bank”, “V2 Extended Menu Bank” etc.
Tips
- Lock the shutter button on the vertical grip (in the portrait mode) to avoid taking photos accidentally while hand holding.
- Detach the battery when camera is not in use as keeping the battery in the camera drains the battery to some extent (around 3% to 5%) though not huge. This is also good for the safety of the equipment.
- “Auto” setting might not work as desired for Video Flicker reduction while shooting indoor under artificial lighting. Using either 50/60 Hz as per the lighting may help in getting better results.
- Connecting to SnapBridge using WiFi takes just couple of seconds. Remote shooting is extremely simple with SnapBridge which supports the shutter speed up to 900 seconds (except BULB).
- Keep one spare battery as a backup just in case if you want to try something in the field like a short 8K/4K video etc.
- Highlight-Weighted Metering is good to preserve highlights as Z9 is little more sensitive to highlights as per my observations.
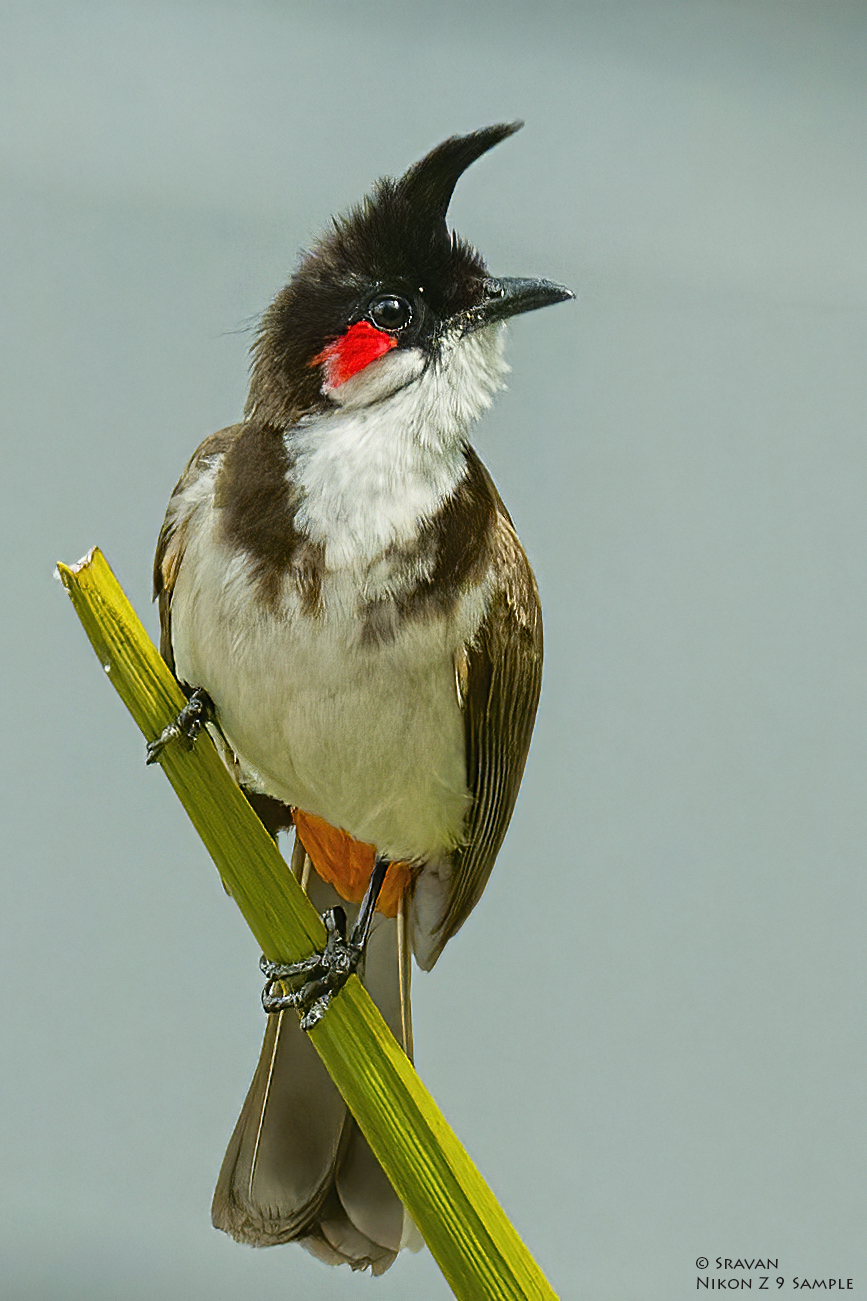
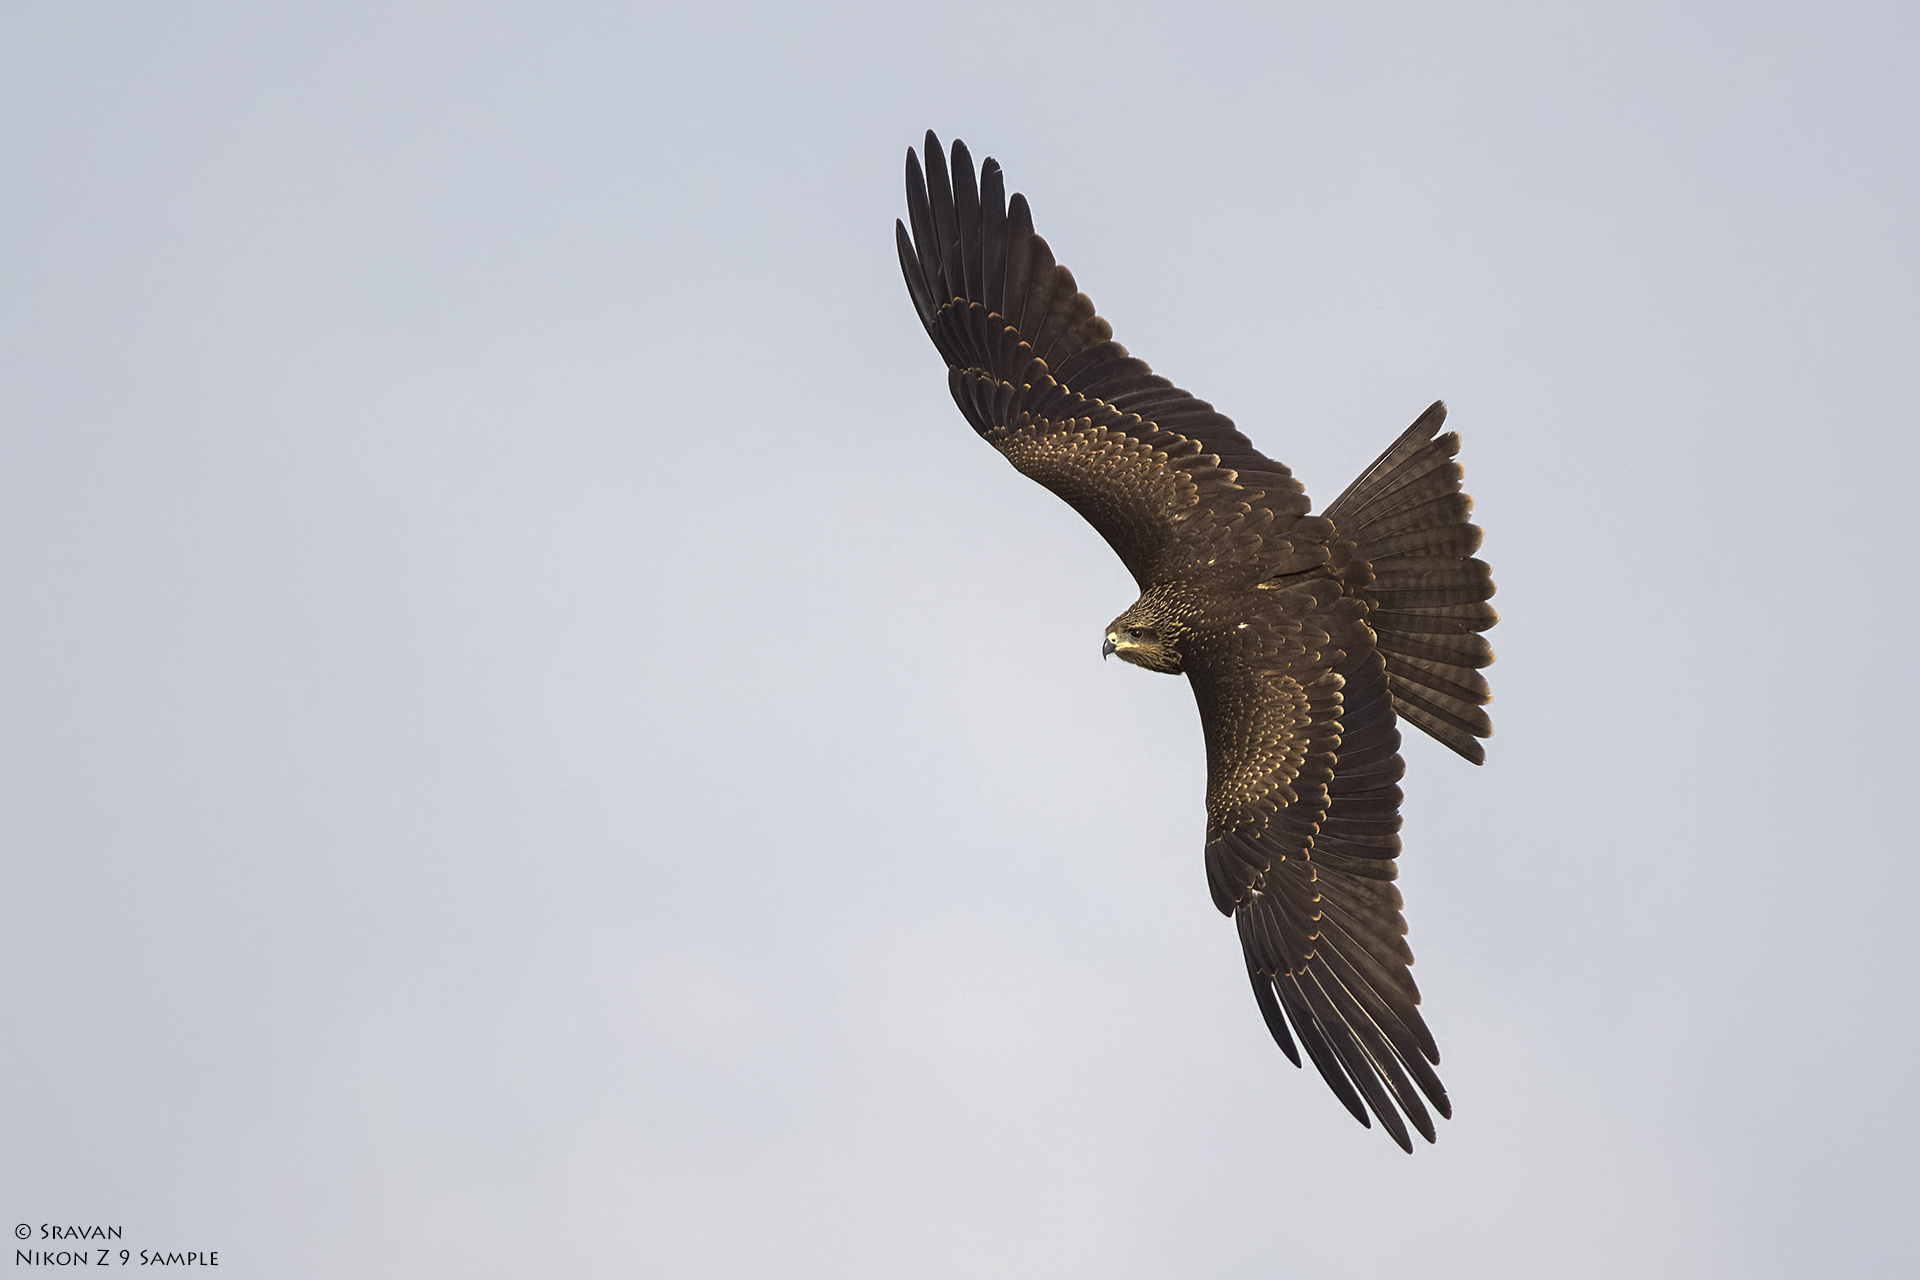
Took this image at 840mm with Sigma 1.4x TC attached to Sigma Sports 150-600m lens. Auto focus is instant for static subjects.
Caution
In rare cases, it may be dangerous to use Power Adapter to charge the battery in the camera. When I went to pickup Nikon Z9, dealer showed me a picture of a totally burnt out Sony A7R3 attached to a Sony 600mm lens which caught fire when charged using AC adapter. So I suggest to use the provided battery charger to charge the battery separately.
Conclusion
It is now tough to go back and shoot with Nikon D500!
© sravanphotography.com